I have been intrigued with this recipe for a while now. It's all over Pinterest. I guess it's the Paleo version of stir fried rice. Instead of using rice for the stir fry, you use grated cauliflower. And since I love fried rice, I decided to give it a try. It's great because it's all vegetables and you cut down on carbs. And goodness knows, I'm always looking for ways to cut calories!!
When I asked my husband how he liked the "stir fry"? He said it was good. He didn't even realize that it wasn't rice. I said it's cauliflower and he said he knew there was some cauliflower in it (because there were little bits of it) , but I told him there was no rice in it what so ever, he really couldn't believe it! And my sister really loved it! So I guess this is a keeper.
The trick to grating the cauliflower in the food processor is not to over crowd it, otherwise it takes a while to grate and then you have mushy cauliflower, which you do NOT want. Just do small batches at time. It really does resemble rice when it is grated properly.
Unfortunately, this the only photo I have...I forgot to take pictures along the way. Sorry.
Stir Fried Cauliflower
I head of cauliflower
2 tablespoons oil
3-4 green onions, diced
1 inch of ginger, finely chopped
2=3 cloves of garlic, minced
1 red pepper, sliced
1 small bunch of kale, thinly sliced
Soy or tamari sauce, to taste
2 teaspoons sesame oil
Coarsely chop the cauliflower into florets. In small batches, pulse the cauliflower in a food processor until it resembles rice. Set aside.
Heat a large pan or wok with oil over medium-high heat and add the green onions, ginger and garlic. Sauté until soft. Turn up heat. Add the red pepper and kale, stirring frequently for 1 minute. Add the cauliflower and soy sauce and continue stirring frequently until the cauliflower is hot and a little crispy. Drizzle with the sesame oil and serve.
m xo
Showing posts with label Healthy. Show all posts
Monday, 3 November 2014
Thursday, 30 October 2014
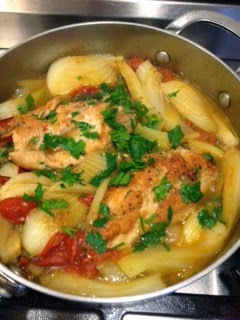
Braised Chicken, Fennel and Tomatoes
Well, as you may have noticed, I haven't been posting much lately. You want to know why? BECAUSE MY HUSBAND IS ON A DIET!!! And I have to say, I'm not liking it much. Not only because he has lost quite a few pounds and I haven't, but also because I'm not cooking what I really want to cook. I've been making a lot chicken dishes. I'm getting sick of chicken! And the thing is, he would be totally fine with the same chicken dish over and over. He is a creature of habit, as you know from my blog...remember, he eats the same thing for breakfast, day after day. And now he eats the same thing for lunch, day after day. It's me that needs variety and I am constantly looking for new ways to make chicken, which I have to say, hasn't been that easy. There are only so many different recipes on Pinterest!
This time I decided to braise the chicken with fennel and tomatoes. Braising the keeps the breasts moist. Easy. Tasty. One pot meal. Doesn't get any better than this.
Braised Chicken, Fennel and Tomatoes
2 chicken breasts, boneless and skinless
1 tablespoon olive oil
2 fennel bulbs, thinly sliced
1 pint of cherry tomatoes, halved
3 green onions, sliced
1 jalapeño, sliced, totally optional
1 tablespoon capers
1 cup chicken stock
Salt and pepper
Parsley, chopped
Heat the olive oil in a pan over medium-high heat. Salt and pepper the chicken and add to pan. Let it brown on one side for about 3 minutes. Turn the chicken over and add the fennel, tomatoes, green onions, jalapeño and capers. Pour the the stock over, cover and reduce the heat. Cook until the chicken is done, which should tale about 10 minutes. Take off the heat and sprinkle with parsley. Serve.
This time I decided to braise the chicken with fennel and tomatoes. Braising the keeps the breasts moist. Easy. Tasty. One pot meal. Doesn't get any better than this.
Braised Chicken, Fennel and Tomatoes
2 chicken breasts, boneless and skinless
1 tablespoon olive oil
2 fennel bulbs, thinly sliced
1 pint of cherry tomatoes, halved
3 green onions, sliced
1 jalapeño, sliced, totally optional
1 tablespoon capers
1 cup chicken stock
Salt and pepper
Parsley, chopped
Heat the olive oil in a pan over medium-high heat. Salt and pepper the chicken and add to pan. Let it brown on one side for about 3 minutes. Turn the chicken over and add the fennel, tomatoes, green onions, jalapeño and capers. Pour the the stock over, cover and reduce the heat. Cook until the chicken is done, which should tale about 10 minutes. Take off the heat and sprinkle with parsley. Serve.
m xo
Wednesday, 29 October 2014
Plenty More...Parsley, Lemon and Cannellini Bean Salad
I have been waiting for my Plenty More by Yotam Ottolenghi for a few weeks. I pre-ordered it! I love this man! His recipes are so beautiful and inspiring. I want to make every single one of them. I'm always amazed at the different combinations of salads and dishes he comes up with. I have never been disappointed with any of his recipes.
I made this salad last night and it was delicious! It kinda of reminds of tabbouli with the amount of herbs in it, except that it is a lot more filling because of the quinoa and beans. It makes for a wonderful light lunch.
It calls for red quinoa, which I happen to have on hand but you can use regular quinoa if you want. Although the contrast on the beans is very pretty...See, I told you his recipes were pretty.
I will definitely be making more recipes from this book, so stay tuned.
Parsley, Lemon and Cannellini Bean Salad
2/3 cups red quinoa
2/3 cups flat leaf parsley, finely shredded
2/3 cups mint, finely shredded
3-4 green onions, thinly sliced
1 1/3 cups cannellini beans, drained
1/2 large lemon, skin and seeds removed, flesh finely chopped
1/2 teaspoon ground allspice
1/4 cup olive oil
Salt and pepper, to taste
Cook the quinoa in boiling water and drain. Rinse under cold water and drain. Set aside and let it dry out. Transfer quinoa to a large bowl and add the rest of the ingredients. Stir together and serve.
I made this salad last night and it was delicious! It kinda of reminds of tabbouli with the amount of herbs in it, except that it is a lot more filling because of the quinoa and beans. It makes for a wonderful light lunch.
It calls for red quinoa, which I happen to have on hand but you can use regular quinoa if you want. Although the contrast on the beans is very pretty...See, I told you his recipes were pretty.
I will definitely be making more recipes from this book, so stay tuned.
2/3 cups red quinoa
2/3 cups flat leaf parsley, finely shredded
2/3 cups mint, finely shredded
3-4 green onions, thinly sliced
1 1/3 cups cannellini beans, drained
1/2 large lemon, skin and seeds removed, flesh finely chopped
1/2 teaspoon ground allspice
1/4 cup olive oil
Salt and pepper, to taste
Cook the quinoa in boiling water and drain. Rinse under cold water and drain. Set aside and let it dry out. Transfer quinoa to a large bowl and add the rest of the ingredients. Stir together and serve.
m xo
Friday, 24 October 2014
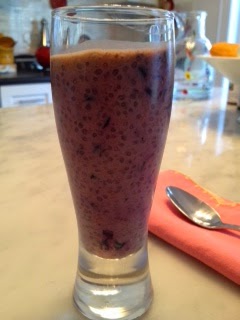
Blueberry Mango Chia Seed Pudding
This is a nice breakfast or a treat at night when you are craving "something sweet" but don't know what? I always crave something sweet after dinner, and this hits the spot!
I made this with blueberries and mangoes because that is what I happened to have on my counter but I have made it with mangoes and dried coconut before and it was equally as nice. You can use just about any fruit you have or like. Just make sure to make it the day before to let the chia seeds set.
Blueberry Mango Chia Seed Pudding
1 lb. blueberries or approximately 2 cups
1 cup chopped mango, fresh or frozen
2 cups almond milk or regular milk
1/2 cup Greek yogurt
1 tablespoon honey or to taste
1 teaspoon vanilla extract
1 teaspoon cinnamon, optional
1/2 cup chia seeds
In a blender, blend the blueberries, mango, almond milk, Greek yogurt, honey, vanilla and cinnamon. Pour in a large bowl and mix in the chia seeds. Stir until the chia seeds are incorporated. Cover with plastic wrap and refrigerate overnight. The next day, the pudding should be thick and creamy. Serve.
m xo
I made this with blueberries and mangoes because that is what I happened to have on my counter but I have made it with mangoes and dried coconut before and it was equally as nice. You can use just about any fruit you have or like. Just make sure to make it the day before to let the chia seeds set.
Blueberry Mango Chia Seed Pudding
1 lb. blueberries or approximately 2 cups
1 cup chopped mango, fresh or frozen
2 cups almond milk or regular milk
1/2 cup Greek yogurt
1 tablespoon honey or to taste
1 teaspoon vanilla extract
1 teaspoon cinnamon, optional
1/2 cup chia seeds
In a blender, blend the blueberries, mango, almond milk, Greek yogurt, honey, vanilla and cinnamon. Pour in a large bowl and mix in the chia seeds. Stir until the chia seeds are incorporated. Cover with plastic wrap and refrigerate overnight. The next day, the pudding should be thick and creamy. Serve.
m xo
Labels:
Almonds
,
Breakfast
,
Fruit
,
Gluten free
,
Greek yogurt
,
Healthy
,
Make Ahead
Wednesday, 22 October 2014
Raw Thai Almond Kelp Noodle Salad
So, this is a first for my blog. A guest in my kitchen!!
Over the years as a hairstylist, I have been very
fortunate to meet some wonderful, interesting people. I have known Barbara
Ollerenshaw for a few years and she has truly inspired me because she recently
went back to school and became a Holistic Nutritionist. I asked her if she had
a dish she would share with me on my blog and this is one of her favourite
dishes. A raw Thai noodle salad. This is a healthy answer for when she gets a
craving for Pad Thai. I love Thai food! I was intrigued!
Raw Thai Almond Kelp Noodle Salad
Noodles
1 package of kelp noodles
Juice of 1/3 of a lemon
Himalayan salt
Dressing
1/2 cup almond butter
1/4 cup olive oil
4 tablespoons tamari
1/2 cup lime juice, about 3 limes
1 tablespoon honey
1 jalapeño, or to taste
2 garlic cloves
1 1/2 inch of ginger, peeled
Salad Vegetables
Red pepper, slivered
Carrots, slivered
Cilantro, chopped
Salad greens
Sprouts
Green onions, chopped
Sprouted mung beans(crunchy pea) to sprinkle on top, optional
For the noodles:
Put the noodle in a strainer and rinse with hot water. Drain well and place in a large bowl. Sprinkle with the lemon juice and a bit of salt. With your hands, message the kelp until soft. Cover and refridgerate.
For the dressing:
Place all the ingredients in a blender and mix until thick and fluffy. This makes more than enough dressing for this salad. Keep leftovers in refrigerator for another salad.
To assemble the salad, cut the noodles with kitchen scissors because they tend to be on the long side. Spoon a couple of tablespoons of dressing on noodles and mix together. Add the veggies and add a little more dressing and mix. The amount of dressing you use depends on the amount of vegetables you have for the salad but don't be afraid to use most of it. The vegetables and the noodles tend to soak up a lot of it. Sprinkle with cilantro and sprouted mung beans, if using. Serve right away.
| Barbara, a Holistic Nutritionist |
This really is a nutritious dish! I've never had
kelp noodles before and I have to say they were very similar to rice noodles
except they were a little on the rubbery side but not in a bad way! If I didn't
know they weren't rice, I probably wouldn't have noticed. The salad itself was
so refreshing and flavourful. It was amazing! The fact that it is also good for
you is an added bonus. Here are just few reasons it's good for you.
Kelp, a sea vegetable is very nutrient rich.
Calcium, iron, manganese and complex B's, to name a few. It also aids in the
healthy growth of nails and hair. And who doesn't want healthy hair and nails?
I talk to a lot of women in my chair and hair and nail growth is one of
our main concerns. The kelp noodles are found in the refrigerated section of
the health food store. Garlic provides enzymes to help with digestion and
alkalizes the body. Ginger is an antibiotic, anti-inflammatory and
stimulates digestion and liver.
I urge to try this recipe, even if it's just to try
something that you haven't had before. Trust me, you'll like it!
Noodles
| massaging the kelp noodles |
1 package of kelp noodles
Juice of 1/3 of a lemon
Himalayan salt
Dressing
1/2 cup almond butter
1/4 cup olive oil
4 tablespoons tamari
1/2 cup lime juice, about 3 limes
1 tablespoon honey
1 jalapeño, or to taste
2 garlic cloves
1 1/2 inch of ginger, peeled
Salad Vegetables
Red pepper, slivered
Carrots, slivered
Cilantro, chopped
Salad greens
Sprouts
Green onions, chopped
Sprouted mung beans(crunchy pea) to sprinkle on top, optional
For the noodles:
Put the noodle in a strainer and rinse with hot water. Drain well and place in a large bowl. Sprinkle with the lemon juice and a bit of salt. With your hands, message the kelp until soft. Cover and refridgerate.
For the dressing:
Place all the ingredients in a blender and mix until thick and fluffy. This makes more than enough dressing for this salad. Keep leftovers in refrigerator for another salad.
To assemble the salad, cut the noodles with kitchen scissors because they tend to be on the long side. Spoon a couple of tablespoons of dressing on noodles and mix together. Add the veggies and add a little more dressing and mix. The amount of dressing you use depends on the amount of vegetables you have for the salad but don't be afraid to use most of it. The vegetables and the noodles tend to soak up a lot of it. Sprinkle with cilantro and sprouted mung beans, if using. Serve right away.
m xo
Tuesday, 26 August 2014
Purslane Salad with Mozzarella and Plums
Where have I been? Living under a rock apparently because I have never had purslane before!!
I had never had nor come across purslane but was intrigued when I saw it at the local farmers market in Borough Hall. Not only is it delicious and crunchy but it is packed full of nutrients like vitamin E and essential omega 3 fatty acid. Apparently it grows everywhere and under many conditions. A very hardy plant. I think I might try to grow it next year in my garden. If you can't find purslane, you can easily substitute watercress or spinach.
This salad was so yummy that we had to have it twice in two days. And the only reason we didn't have it again was because the farmers market didn't have the purslane when I went back a couple of days later.
I knew that I definitely wanted to make a salad and knew exactly what I was going to put in it. My next stop was the market down the street where I bought fresh mozzarella. The combination of the crunchy purslane, the creamy mozzarella, sweet plums and salty French, oily olives made this salad one of the best ones I've made so far (I don't mean to toot my own horn...but I just did)!! lol
There aren't any amounts here. Just use however much you want in your salad. Customize it to your liking. You want more greens, use more greens, want less cheese, use less mozzarella. The point is to make it yours.
Purslane Salad with Mozzarella and Plums
Purslane or watercress or spinach
Fresh mozzarella
Plums
Black, oily, wrinkly olives
Olive oil
Red or white wine vinegar
Salt and pepper
I like to dress the greens first with vinegar, olive oil, salt and pepper and then place the other ingredients on top. Drizzle with a little olive oil.
m xo
I had never had nor come across purslane but was intrigued when I saw it at the local farmers market in Borough Hall. Not only is it delicious and crunchy but it is packed full of nutrients like vitamin E and essential omega 3 fatty acid. Apparently it grows everywhere and under many conditions. A very hardy plant. I think I might try to grow it next year in my garden. If you can't find purslane, you can easily substitute watercress or spinach.
This salad was so yummy that we had to have it twice in two days. And the only reason we didn't have it again was because the farmers market didn't have the purslane when I went back a couple of days later.
I knew that I definitely wanted to make a salad and knew exactly what I was going to put in it. My next stop was the market down the street where I bought fresh mozzarella. The combination of the crunchy purslane, the creamy mozzarella, sweet plums and salty French, oily olives made this salad one of the best ones I've made so far (I don't mean to toot my own horn...but I just did)!! lol
There aren't any amounts here. Just use however much you want in your salad. Customize it to your liking. You want more greens, use more greens, want less cheese, use less mozzarella. The point is to make it yours.
Purslane or watercress or spinach
Fresh mozzarella
Plums
Black, oily, wrinkly olives
Olive oil
Red or white wine vinegar
Salt and pepper
I like to dress the greens first with vinegar, olive oil, salt and pepper and then place the other ingredients on top. Drizzle with a little olive oil.
m xo
Tuesday, 19 August 2014
Stewed Green Beans
Boy!! Do we have a lot of green beans growing in our garden. It still amazes me every summer how well our garden does. It's just so hard to imagine when you plant in the spring, that you will actually have fresh vegetables in a few months.
We especially have a lot of green beans at this time and this is how I grew up eating them. Stewed, very lightly with a few tomatoes and some aromatics. Actually, we also use this method for zucchini, cauliflower and broccoli too. So easy and delicious. You will definitely need some crusty bread to sop up all the wonderful juices from the tomatoes.
Stewed Green Beans
2 lbs. green beans, trimmed and cut in 2 inch pieces
1 lb. cherry tomatoes, ripe
1 red onion, chopped
1 clove garlic, chopped
Handful basil leaves, torn
2 teaspoons salt
peperoncino, optional
2 tablespoons olive oil and more to drizzle over beans
1/2 cup water
In a large pot, heat olive oil over medium heat and add the onion and garlic. Saute until soft. Add the cherry tomatoes, salt, torn basil leaves and water. Cover with a tight fitting lid and cook for 15 minutes or until the cherry tomatoes have all burst. Add the green beans and cover with lid again for 12 minutes. At this point the green beans should be tender without being over cooked. Drizzle with a little more olive oil and serve.
We especially have a lot of green beans at this time and this is how I grew up eating them. Stewed, very lightly with a few tomatoes and some aromatics. Actually, we also use this method for zucchini, cauliflower and broccoli too. So easy and delicious. You will definitely need some crusty bread to sop up all the wonderful juices from the tomatoes.
Stewed Green Beans
2 lbs. green beans, trimmed and cut in 2 inch pieces
1 lb. cherry tomatoes, ripe
1 red onion, chopped
1 clove garlic, chopped
Handful basil leaves, torn
2 teaspoons salt
peperoncino, optional
2 tablespoons olive oil and more to drizzle over beans
1/2 cup water
In a large pot, heat olive oil over medium heat and add the onion and garlic. Saute until soft. Add the cherry tomatoes, salt, torn basil leaves and water. Cover with a tight fitting lid and cook for 15 minutes or until the cherry tomatoes have all burst. Add the green beans and cover with lid again for 12 minutes. At this point the green beans should be tender without being over cooked. Drizzle with a little more olive oil and serve.
m xo
Labels:
Basil
,
Green Beans
,
Healthy
,
Tomatoes
Tuesday, 29 July 2014
Stuffed Tomatoes
This recipe came together easily enough. I was supposed to make stuffed portobello mushrooms for dinner but after seeing an iridologist earlier in the day for some minor health issues, she told me to eliminate mushrooms. So I had to come up with plan B. Stuffed tomatoes! Why? Because they were on my counter. And actually, they were really great because I used ground chicken and the tomatoes added a lot of juice. John really enjoyed them.
I essentially used my meatball recipe but subbed the chicken for the beef and because the iridologist also told me to eliminate bread, I subbed soaked oatmeal for breadcrumbs. It worked well for this. I would definitely do this for meatballs and tomato sauce too.
I had about a dozen medium sized tomatoes and I still had a little stuffing left over, which I made into a patty and grilled. It just depends on the size of your tomatoes. I'm going to say 12 for this recipe and if you have left over stuffing, grill it for lunch the next day.
Stuffed Tomatoes
12 medium sized tomatoes
1 pound ground chicken
1/2 cup oatmeal, soaked in milk for 20 minutes
1 egg, lightly beaten
1/3 cup parmesan cheese
1/4 cup chopped herbs (I used a combination of cilantro, mint and basil)
2 cloves garlic, minced
2 teaspoons salt
1 teaspoon pepper
olive oil to drizzle over tomatoes
Preheat oven to 400F.
Slice off the tops of the tomatoes and with a small spoon, scoop out the seeds and some of the membranes. Sprinkle the inside with salt and turn upside down on paper towels.
In the meantime, in a bowl combine the ground chicken, soaked oatmeal, egg, parmesan cheese, herbs, garlic, salt and pepper. Stuff the tomatoes to the top and place in a greased oven proof baking dish. Drizzle the tops of the tomatoes with more olive oil. Cover with foil and bake for 40 minutes. Uncover and bake for another 15 minutes until the tops are golden. Serve.
m xo
I essentially used my meatball recipe but subbed the chicken for the beef and because the iridologist also told me to eliminate bread, I subbed soaked oatmeal for breadcrumbs. It worked well for this. I would definitely do this for meatballs and tomato sauce too.
I had about a dozen medium sized tomatoes and I still had a little stuffing left over, which I made into a patty and grilled. It just depends on the size of your tomatoes. I'm going to say 12 for this recipe and if you have left over stuffing, grill it for lunch the next day.
12 medium sized tomatoes
1 pound ground chicken
1/2 cup oatmeal, soaked in milk for 20 minutes
1 egg, lightly beaten
1/3 cup parmesan cheese
1/4 cup chopped herbs (I used a combination of cilantro, mint and basil)
2 cloves garlic, minced
2 teaspoons salt
1 teaspoon pepper
olive oil to drizzle over tomatoes
Slice off the tops of the tomatoes and with a small spoon, scoop out the seeds and some of the membranes. Sprinkle the inside with salt and turn upside down on paper towels.
In the meantime, in a bowl combine the ground chicken, soaked oatmeal, egg, parmesan cheese, herbs, garlic, salt and pepper. Stuff the tomatoes to the top and place in a greased oven proof baking dish. Drizzle the tops of the tomatoes with more olive oil. Cover with foil and bake for 40 minutes. Uncover and bake for another 15 minutes until the tops are golden. Serve.
m xo
Labels:
Basil
,
Chicken
,
Cilantro
,
Healthy
,
Mint
,
Parmesan Cheese
,
Tomatoes
,
Vegetables
Tuesday, 22 July 2014
Panzanella
It's summer time!!!! Woo too!!! Can you tell this is my favourite time of year? Hence my lack of postings. Sorry. I'm out and about. Lots to see! Lots to do! And lots to eat! Everything just tastes so much better, don't you think? I'm still cooking and baking but I just haven't had a chance to sit down and write. I'm still trying to balance this all out. I'm trying not to be so hard on myself for not keeping up with things. I guess I have to cut myself some slack. But I had to share this great summertime salad!
If things do get a little hectic and you want to throw something together quickly, I urge you to make this! Panzanella! Because you let the tomatoes sit in the vinaigrette for a few minutes, the ingredients just come together to make a flavourful tasting salad. You basically throw in your tomatoes, cucumbers and a simple vinaigrette of red wine vinegar and olive oil. Add some day old, crusty bread that you have hanging around and serve. The lack of dairy makes it a great dish to bring to a picnic.
Panzanella
2 pounds of tomatoes, cut into wedges
1 English cucumbers, cut up
1 cup of artichokes (in water or oil), halved or quartered
1 red onion, sliced
1/2 cup kalamata olives
1 cup basil leaves
Bread, baguette or ciabatta
For vinaigrette:
1/2 cup olive oil
1/4 cup red wine vinegar
Salt and pepper, to taste
1 teaspoon dried oregano
Preheat to 400F. Place bread on a baking sheet and bake for 10 minutes or until golden brown. Cool, tear into pieces if bread is in bigger pieces and set aside.
In a large bowl, combine tomatoes, cucumbers, artichokes, red onions, kalamata olives and torn up basil.
To make the vinaigrette, in a mason jar, combine olive oil, vinegar, salt and pepper and dried oregano. Shake and pour over salad. Let mixture sit for at least 10 minutes. The longer it sits, the juicier the tomatoes will be. Add the bread and serve.
m xo
If things do get a little hectic and you want to throw something together quickly, I urge you to make this! Panzanella! Because you let the tomatoes sit in the vinaigrette for a few minutes, the ingredients just come together to make a flavourful tasting salad. You basically throw in your tomatoes, cucumbers and a simple vinaigrette of red wine vinegar and olive oil. Add some day old, crusty bread that you have hanging around and serve. The lack of dairy makes it a great dish to bring to a picnic.
Panzanella
2 pounds of tomatoes, cut into wedges
1 English cucumbers, cut up
1 cup of artichokes (in water or oil), halved or quartered
1 red onion, sliced
1/2 cup kalamata olives
1 cup basil leaves
Bread, baguette or ciabatta
For vinaigrette:
1/2 cup olive oil
1/4 cup red wine vinegar
Salt and pepper, to taste
1 teaspoon dried oregano
Preheat to 400F. Place bread on a baking sheet and bake for 10 minutes or until golden brown. Cool, tear into pieces if bread is in bigger pieces and set aside.
In a large bowl, combine tomatoes, cucumbers, artichokes, red onions, kalamata olives and torn up basil.
To make the vinaigrette, in a mason jar, combine olive oil, vinegar, salt and pepper and dried oregano. Shake and pour over salad. Let mixture sit for at least 10 minutes. The longer it sits, the juicier the tomatoes will be. Add the bread and serve.
m xo
Saturday, 5 July 2014
You say cold soup, I say gazpacho...Pineapple Cucumber Gazpacho
I didn't know if I should call this a cold soup or a gazpacho. Either way, I think it alienates a lot of people as soon as you say it's a cold soup or gazpacho. You either love it or hate it. I personally love it. It's very refreshing and it has a nice kick from the jalapeno.
I've had this recipe on hand a few years and I recently came upon it again when I cleaned out a closet that I've been meaning to get to for a while. I used to make it all the time in the summer. Put everything in a blender and Bob's your uncle. Easy. Peasy.
Pineapple Cucumber Soup
3 cups fresh pineapple
3 cups cucumber, peeled
1/2-1 jalapeño, depending on the heat you want
2 green onions, white part only
handful of cilantro
1 cup coconut water
juice of a lime
1 teaspoon salt
Place all the ingredients in a blender or food processor and mix until pureed. Chill and serve.
I've had this recipe on hand a few years and I recently came upon it again when I cleaned out a closet that I've been meaning to get to for a while. I used to make it all the time in the summer. Put everything in a blender and Bob's your uncle. Easy. Peasy.
Pineapple Cucumber Soup
3 cups fresh pineapple
3 cups cucumber, peeled
1/2-1 jalapeño, depending on the heat you want
2 green onions, white part only
handful of cilantro
1 cup coconut water
juice of a lime
1 teaspoon salt
Place all the ingredients in a blender or food processor and mix until pureed. Chill and serve.
Labels:
Gluten free
,
Healthy
Wednesday, 2 July 2014
Minestrone Soup with Fregola
Schools out and I had my niece Ella over and she wanted to help out in the kitchen so I thought, why not make a soup? It involves a lot of chopping and slicing and a little sous chef is always welcome! I just used what I happened to have in my refrigerator which included some corn on the cob that I steamed in foil packets over the weekend. I took the kernels off the cobs and added it to the soup 10 minutes into the cooking, seeing as they were already cooked. But you can use fresh corn off the cob or frozen corn that is thawed, just add it along with the other vegetables.
Because I had the kids for lunch I added fregola (a small, Sardinian semolina pasta) to the minestrone. You can use orzo or any small pasta. Or you can make it totally pasta free, which I usually do but I have to say I totally LOVED it with the pastina! Reminds me of my childhood because my mother always added tubettini (small tubes) in the minestrone.
I also added a piece of parmesan rind to soup as it was cooking because it adds a lot of flavour and I always have some on hand in the refrigerator I never throw them away! They are great to throw in soups. If you don't have any on hand, you can top the soup with grated parmesan when serving.
Minestrone Soup with Fregola
2 tablespoons of olive oil
1/4 cup sliced pancetta or bacon
1 leek, white and light green part only, chopped
1 red onion, chopped
5-6 carrots, chopped
2 celery stalks, chopped
2 small zucchini, chopped
1 bunch of asparagus, chopped
3 corn on the cobs, kernels removed or 2 cups frozen corn, thawed
4 cups chicken broth + 2 cups if adding pasta
1 cup of fregola, orzo or any small pasta
Salt and pepper, to taste
1 piece of parmesan rind (optional)
Grated parmesan cheese
1/4 cup fresh basil leaves, torn
In a Dutch oven, over medium/high heat, cook the pancetta or bacon in the olive oil until crispy. Add the leek and red onion and sauté until soft. Add the carrots, celery, zucchini, asparagus, corn and 4 cups of chicken broth if not adding pasta or 6 cups if adding pasta. Adjust seasoning with salt and pepper. Bring up to a boil, add the fregola and the parmesan rind if using. Keep an eye on it, stirring frequently to make sure the fregola doesn't stick to the bottom of the pot. It should take about 20 minutes for the pasta to cook. If not adding the pasta, bring to a boil, lower heat and simmer for 20 minutes. Take off the heat and stir in the torn basil leaves. Serve hot with grated parmesan cheese.
Because I had the kids for lunch I added fregola (a small, Sardinian semolina pasta) to the minestrone. You can use orzo or any small pasta. Or you can make it totally pasta free, which I usually do but I have to say I totally LOVED it with the pastina! Reminds me of my childhood because my mother always added tubettini (small tubes) in the minestrone.
I also added a piece of parmesan rind to soup as it was cooking because it adds a lot of flavour and I always have some on hand in the refrigerator I never throw them away! They are great to throw in soups. If you don't have any on hand, you can top the soup with grated parmesan when serving.
Minestrone Soup with Fregola
2 tablespoons of olive oil
1/4 cup sliced pancetta or bacon
1 leek, white and light green part only, chopped
1 red onion, chopped
5-6 carrots, chopped
2 celery stalks, chopped
2 small zucchini, chopped
1 bunch of asparagus, chopped
3 corn on the cobs, kernels removed or 2 cups frozen corn, thawed
4 cups chicken broth + 2 cups if adding pasta
1 cup of fregola, orzo or any small pasta
Salt and pepper, to taste
1 piece of parmesan rind (optional)
Grated parmesan cheese
1/4 cup fresh basil leaves, torn
In a Dutch oven, over medium/high heat, cook the pancetta or bacon in the olive oil until crispy. Add the leek and red onion and sauté until soft. Add the carrots, celery, zucchini, asparagus, corn and 4 cups of chicken broth if not adding pasta or 6 cups if adding pasta. Adjust seasoning with salt and pepper. Bring up to a boil, add the fregola and the parmesan rind if using. Keep an eye on it, stirring frequently to make sure the fregola doesn't stick to the bottom of the pot. It should take about 20 minutes for the pasta to cook. If not adding the pasta, bring to a boil, lower heat and simmer for 20 minutes. Take off the heat and stir in the torn basil leaves. Serve hot with grated parmesan cheese.
m xo
Labels:
Asparagus
,
Bacon
,
Basil
,
Carrots
,
Healthy
,
Onions
,
Soups and stews
,
Vegetables
,
Zucchini
Thursday, 1 May 2014
Just Another Quinoa Stir Fry
So, here's the thing. The beginning of the week I wanted to cook some quinoa for the broccoli muffins that I made, and as I measured out the dry quinoa that the recipe called for, I noticed that there really wouldn't be much left in the bag, so I decided to cook the whole thing…well, boy, did it make a lot of quinoa!! And thank goodness we love quinoa because we have been eating it in different forms ALL week.
Tonight I made a broccoli stir fry. I love stir fries because you can basically throw in whatever odds and ends you have in the refrigerator. And this week was perfect because we are going away and I need to "clean" the refrigerator. I hate to throw anything away. I happen to have steamed broccoli and carrots. Again, I'm not giving you exact amounts here because it depends on what you have and how many people you are feeding.
Broccoli Quinoa Stir Fry
Oil
2-3 eggs, lightly beaten
1 red onion, chopped
2-3 garlic cloves, minced
Fresh ginger, minced
1-2 hot, red chili, minced
1-2 cups cooked quinoa
Broccoli, steamed
Carrots, sliced
2-3 tablespoons soy sauce
Sesame oil
Heat wok or pan over high heat. Add the eggs and cook until set but still moist. Remove from pan and set aside. Heat more oil in the wok and when hot and add the onion, garlic, ginger and chili's, if using. Cook for 2 minutes. Add the broccoli, carrots, quinoa and scrambled eggs and stir fry until everything is combined and warmed through. Drizzle on some soy sauce and and a few drops of sesame oil. Serve.
Tonight I made a broccoli stir fry. I love stir fries because you can basically throw in whatever odds and ends you have in the refrigerator. And this week was perfect because we are going away and I need to "clean" the refrigerator. I hate to throw anything away. I happen to have steamed broccoli and carrots. Again, I'm not giving you exact amounts here because it depends on what you have and how many people you are feeding.
Oil
2-3 eggs, lightly beaten
1 red onion, chopped
2-3 garlic cloves, minced
Fresh ginger, minced
1-2 hot, red chili, minced
1-2 cups cooked quinoa
Broccoli, steamed
Carrots, sliced
2-3 tablespoons soy sauce
Sesame oil
Heat wok or pan over high heat. Add the eggs and cook until set but still moist. Remove from pan and set aside. Heat more oil in the wok and when hot and add the onion, garlic, ginger and chili's, if using. Cook for 2 minutes. Add the broccoli, carrots, quinoa and scrambled eggs and stir fry until everything is combined and warmed through. Drizzle on some soy sauce and and a few drops of sesame oil. Serve.
m xo
Labels:
Broccoli
,
Carrots
,
Gluten free
,
Healthy
,
Quick Dinner
,
Quinoa
,
Stir Fry
Tuesday, 29 April 2014
Cheesy Quinoa Muffins
Ok, so these muffins came together like the perfect storm. I pinned them a while ago and have been wanting to make them for quite a while but just never got around to it…until today. I looked in my refrigerator and had EVERYTHING. I didn't have to substitute anything. Those who have been following me know that I do a lot substituting when I'm in the kitchen and sometimes it's not even that I don't have a certain ingredient, it's just that I want to try something different. But this time I did exactly what the recipe called for, and they were great! I think these would make a nice picnic fare. Or for lunch, with a salad.
Just a little tip that I think would help. When you take them out of the oven, cool them completely before taking them out of the muffin tin. They stuck to the pan a little when I tried to take them when they were still warm.
Cheesy Broccoli Quinoa Muffins
2 cups cooked quinoa
1 small broccoli, cooked and chopped
2 cups shredded cheddar cheese
3 green onions, chopped
2 tablespoons sriracha
3 eggs
1 teaspoon salt
1/2 teaspoon pepper
Preheat oven to 350F. Generously grease a 12 cup muffin pan.
Mix everything together and fill muffin pan. Bake for 45 minutes until golden. Cool in pan before removing from the pan.
Just a little tip that I think would help. When you take them out of the oven, cool them completely before taking them out of the muffin tin. They stuck to the pan a little when I tried to take them when they were still warm.
Cheesy Broccoli Quinoa Muffins
2 cups cooked quinoa
1 small broccoli, cooked and chopped
2 cups shredded cheddar cheese
3 green onions, chopped
2 tablespoons sriracha
3 eggs
1 teaspoon salt
1/2 teaspoon pepper
Preheat oven to 350F. Generously grease a 12 cup muffin pan.
Mix everything together and fill muffin pan. Bake for 45 minutes until golden. Cool in pan before removing from the pan.
m xo
Labels:
Baked goods
,
Broccoli
,
Cheese
,
Gluten free
,
Healthy
,
Quinoa
Monday, 28 April 2014
Merluzzo al Forno
I never knew what this fish was called in English until I had to find a translation for this post. Hake or whiting, thats what I found on the world wide web. Not sure if that helps, but if you go to any fish monger, they will know what it is for sure.
Merluzzo is sooo good! It's a nice flakey, mild tasting fish. I'm not going to lie here, I buy it from my fish monger already clean and frozen. I hate cleaning fish. Come to think of it, I don't think I've ever cleaned fish, except shrimp. That's easy.
So anyway, I took out the fish fillets a couple of hours before I wanted to cook them. They don't need that long to defrost.
Preheat oven to 375F.
Brush a baking dish with some olive oil.
Place the fillets in the pan and season with salt and pepper.
Add a sliced garlic clove.
Sprinkle with herbes de provence.
Dust with some ground almonds.
Add a splash of dry vermouth.
Top with a few cherry tomatoes.
Drizzle with a little more olive oil.
Bake for 15 minutes.
This was really tasty! You must try it.
m xo
Merluzzo is sooo good! It's a nice flakey, mild tasting fish. I'm not going to lie here, I buy it from my fish monger already clean and frozen. I hate cleaning fish. Come to think of it, I don't think I've ever cleaned fish, except shrimp. That's easy.
So anyway, I took out the fish fillets a couple of hours before I wanted to cook them. They don't need that long to defrost.
Preheat oven to 375F.
Brush a baking dish with some olive oil.
Place the fillets in the pan and season with salt and pepper.
Add a sliced garlic clove.
Sprinkle with herbes de provence.
Dust with some ground almonds.
Add a splash of dry vermouth.
Top with a few cherry tomatoes.
Drizzle with a little more olive oil.
Bake for 15 minutes.
This was really tasty! You must try it.
m xo
Labels:
Gluten free
,
Healthy
,
Seafood
,
Tomatoes
Wednesday, 23 April 2014
Springtime Golden Split Pea Soup
I planned on making this split pea soup a few weeks ago, the beginning of spring. The recipe was in the March edition of Vitality magazine. I went out and bought the split peas but they just sat there, waiting for me to make them into soup. Better late than ever.
I liked the soup but I have to warn you, if you don't like sweet, this is not for you. The lime juice at the end is definitely needed, it cuts down on the sweetness a bit. Maybe next time I would eliminate the pear, I don't think it was needed, but you be the judge. I thought this was perfect for a cool, overcast day like yesterday.
Golden Split Pea Soup
2 tablespoons olive oil
2 large white onions, chopped
1/2 teaspoon ground cumin
1 teaspoon ground coriander
2 teaspoons turmeric
1 tablespoon fresh ginger, grated
1 cup dried yellow split peas
2 cups peeled, cubed sweet potato
1 pear, peeled, cubed pear
3 inch cinnamon stick
1 cup chopped tomatoes
2 teaspoons chili powder
7 cups water
2 teaspoons salt
Juice of a lime
Chopped cilantro
In a large pot, sauté onion in olive oil until soft. Add the cumin, coriander, turmeric and ginger and cook another minute. Next add the split peas, sweet potatoes, pear, cinnamon stick, tomatoes, chili powder and water. Cover and bring to a boil. Lower heat and simmer for about an hour till the split peas are tender.
Take off the stove, remove cinnamon stick and puree with a hand blender or food processor. Stir in the lime juice and chopped cilantro.
I liked the soup but I have to warn you, if you don't like sweet, this is not for you. The lime juice at the end is definitely needed, it cuts down on the sweetness a bit. Maybe next time I would eliminate the pear, I don't think it was needed, but you be the judge. I thought this was perfect for a cool, overcast day like yesterday.
Golden Split Pea Soup
2 tablespoons olive oil
2 large white onions, chopped
1/2 teaspoon ground cumin
1 teaspoon ground coriander
2 teaspoons turmeric
1 tablespoon fresh ginger, grated
1 cup dried yellow split peas
2 cups peeled, cubed sweet potato
1 pear, peeled, cubed pear
3 inch cinnamon stick
1 cup chopped tomatoes
2 teaspoons chili powder
7 cups water
2 teaspoons salt
Juice of a lime
Chopped cilantro
In a large pot, sauté onion in olive oil until soft. Add the cumin, coriander, turmeric and ginger and cook another minute. Next add the split peas, sweet potatoes, pear, cinnamon stick, tomatoes, chili powder and water. Cover and bring to a boil. Lower heat and simmer for about an hour till the split peas are tender.
Take off the stove, remove cinnamon stick and puree with a hand blender or food processor. Stir in the lime juice and chopped cilantro.
m xo
Labels:
Chili
,
Cilantro
,
Cumin
,
Gluten free
,
Healthy
,
Legumes
,
Soups and stews
,
Sweet potato
Tuesday, 8 April 2014
Fennel and Beet Salad with Tarragon-Shallot Vinaigrette
My go-to salad dressing is pretty basic: olive oil and vinegar. It's what I grew up with. Sometimes we would convince my mom to buy the bottled salad dressing because we wanted to be like everyone else, but inevitably we would have it once or twice and then go back to our usual oil and vinegar.
I came across this tarragon and shallot vinaigrette recipe awhile ago and filed it away for when I had tarragon to use up. This time it wasn't my tarragon but my sister's, who had leftover from something she made with it. Alexandra, from "Alexandra's Kitchen" blog, suggests you double the batch just to have on hand, well thank goodness I did because I loved it! The tarragon gives it a nice anise flavour and really enhanced the fennel that I made my salad with. I'm planning on making the salad the rest of the week!!
I combined all the ingredients in a mason jar. It was easy to shake up and store in refrigerator.
Tarragon-Shallot Vinaigrette
(from Alexandra's Kitchen)
4 teaspoons sherry vinegar
1 shallot, finely chopped
1/4 teaspoon sugar
1/2 teaspoon Dijon mustard
1/4 teaspoon salt
1/4 cup olive oil
2-3 tablespoons tarragon, finely chopped
Combine vinegar, shallots, sugar, mustard, salt, olive oil and tarragon. Macerate for a few minutes before using.
I came across this tarragon and shallot vinaigrette recipe awhile ago and filed it away for when I had tarragon to use up. This time it wasn't my tarragon but my sister's, who had leftover from something she made with it. Alexandra, from "Alexandra's Kitchen" blog, suggests you double the batch just to have on hand, well thank goodness I did because I loved it! The tarragon gives it a nice anise flavour and really enhanced the fennel that I made my salad with. I'm planning on making the salad the rest of the week!!
I combined all the ingredients in a mason jar. It was easy to shake up and store in refrigerator.
Tarragon-Shallot Vinaigrette
(from Alexandra's Kitchen)
4 teaspoons sherry vinegar
1 shallot, finely chopped
1/4 teaspoon sugar
1/2 teaspoon Dijon mustard
1/4 teaspoon salt
1/4 cup olive oil
2-3 tablespoons tarragon, finely chopped
Combine vinegar, shallots, sugar, mustard, salt, olive oil and tarragon. Macerate for a few minutes before using.
I just threw this salad together with what I happened to have in my refrigerator. The combination totally rocked!!
Baby greens
Fennel
Roasted beets
Dried cranberries
Almonds
Feta cheese
m xo
Monday, 7 April 2014
Breakfast A Go-Go
It seems like everywhere I look, there are mason jar recipes. Salad in a mason jar, pasta in a mason jar, cookies in a mason jar, lemonade in a mason jar, soup in a mason jar. You get the picture...Well I love this idea!! They look so pretty and best of all, they're portable. I really like this concept for lunches or any on the go meal. Think how fabulous they would be for picnics or the beach. You can get real creative with this concept.
I came across oatmeal in a jar on Pinterest I think. And because my favourite way to eat oatmeal is soaked overnight, I thought I would give it a try. It was great, especially on mornings you know are going to be rushed. Or if you go to the gym before you go to work in the morning, just pop it in your gym bag and it's ready for you when you're done your work out. And so easy to put together the night before.
The recipe I'm sharing with you is made with quinoa flakes instead of oatmeal. I had them sitting in my pantry and gave it a try with this method instead of cooking them, which I never did. It was good! I used raspberries but you can obviously use any fruit you like.
Breakfast in a Jar
1/4 cup quinoa flakes
1/4 cup Greek yogurt
1/2 cup almond milk
1 tablespoon chia seeds
1 teaspoon honey
cinnamon, to taste
raspberries
Combine all ingredients, except the raspberries in a mason jar and shake. Top with raspberries and refrigerate overnight.
m xo
I came across oatmeal in a jar on Pinterest I think. And because my favourite way to eat oatmeal is soaked overnight, I thought I would give it a try. It was great, especially on mornings you know are going to be rushed. Or if you go to the gym before you go to work in the morning, just pop it in your gym bag and it's ready for you when you're done your work out. And so easy to put together the night before.
The recipe I'm sharing with you is made with quinoa flakes instead of oatmeal. I had them sitting in my pantry and gave it a try with this method instead of cooking them, which I never did. It was good! I used raspberries but you can obviously use any fruit you like.
Breakfast in a Jar
1/4 cup quinoa flakes
1/4 cup Greek yogurt
1/2 cup almond milk
1 tablespoon chia seeds
1 teaspoon honey
cinnamon, to taste
raspberries
Combine all ingredients, except the raspberries in a mason jar and shake. Top with raspberries and refrigerate overnight.
m xo
Friday, 28 March 2014
One Pot Kale and Quinoa Pilaf
I came across this pilaf on Food52, the site that I absolutely adore! I can't get enough of this site. Some people read novels in their spare time. I read cookbooks and browse food blogs. Is that wrong?
I usually like to bring my lunch from home when I can and so does my husband. While he is ok with a can of tuna and a green salad, every single day, (may I add), I am not. I don't mind having the same thing for a couple days, especially if it's leftovers from dinner, but John CAN and DOES eat the same thing for weeks on end. Remember the granola bar he has every morning? Hahaha!
I saw this recipe and happen to have all the ingredients on hand and thought it would be perfect for our lunches. I tweaked it a little by deleting the green onions, switching up pine nuts for walnuts, feta for goat cheese (not a fan) and I added dried cranberries. Deliscous and easy. Pack in to-go containers and you have healthy lunches. By the way, I got 3 lunches out of it. But depending on your hunger, you might get 2.
One Pot Kale and Quinoa Pilaf
2 cups salted water
1 cup quinoa
1 bunch of kale, washed and chopped into 1/2 inch ribbons
1 organic lemon, zested and juiced
2 tablespoons walnut oil
1/2 cup walnuts, toasted and chopped
1/4 cup feta, crumbled
1/4 cup dried cranberries
salt and pepper, to taste
Bring the water to a boil in a covered pot. Add the quinoa, cover and lower the heat to a simmer. Let simmer for 10 minutes, then top with the kale and re-cover. Simmer another 5 minutes, turn off the heat and let it steam for 5-10 minutes.
In the meantime, in a large bowl, combine the lemon juice, zest, walnut oil, nuts, cranberries and salt and pepper.
Check the quinoa and kale and make sure the water has all been absorbed. Fluff with a fork and tip in the bowl with the remaining ingredients. Toss to combine. Serve warm or room temperature if you are serving right away. I also liked it cold, from the refrigerator.
m xo
I usually like to bring my lunch from home when I can and so does my husband. While he is ok with a can of tuna and a green salad, every single day, (may I add), I am not. I don't mind having the same thing for a couple days, especially if it's leftovers from dinner, but John CAN and DOES eat the same thing for weeks on end. Remember the granola bar he has every morning? Hahaha!
I saw this recipe and happen to have all the ingredients on hand and thought it would be perfect for our lunches. I tweaked it a little by deleting the green onions, switching up pine nuts for walnuts, feta for goat cheese (not a fan) and I added dried cranberries. Deliscous and easy. Pack in to-go containers and you have healthy lunches. By the way, I got 3 lunches out of it. But depending on your hunger, you might get 2.
One Pot Kale and Quinoa Pilaf 2 cups salted water
1 cup quinoa
1 bunch of kale, washed and chopped into 1/2 inch ribbons
1 organic lemon, zested and juiced
2 tablespoons walnut oil
1/2 cup walnuts, toasted and chopped
1/4 cup feta, crumbled
1/4 cup dried cranberries
salt and pepper, to taste
Bring the water to a boil in a covered pot. Add the quinoa, cover and lower the heat to a simmer. Let simmer for 10 minutes, then top with the kale and re-cover. Simmer another 5 minutes, turn off the heat and let it steam for 5-10 minutes.
In the meantime, in a large bowl, combine the lemon juice, zest, walnut oil, nuts, cranberries and salt and pepper.
Check the quinoa and kale and make sure the water has all been absorbed. Fluff with a fork and tip in the bowl with the remaining ingredients. Toss to combine. Serve warm or room temperature if you are serving right away. I also liked it cold, from the refrigerator.
m xo
Labels:
Cranberries
,
Feta
,
Gluten free
,
Healthy
,
Kale
,
Quinoa
Tuesday, 25 March 2014
Stuffed Zucchini
During the week, I'm always looking for ways to cut down on simple carbs (but not flavour) when I can.This is just a simple recipe for stuffed zucchini that I came up with for last nights dinner. It was very satisfying with a salad.
Stuffed Zucchini
4 small zucchini
2 tablespoons grape seed oil
1 lb. ground beef
1 shallot, chopped
2 cloves garlic, chopped
1 small red chili (optional)
1 tablespoon tomato paste
2 tablespoons tamari
3-4 handfuls of baby spinach
salt and pepper, to taste
feta cheese
Preheat oven to 350F.
Slice the zucchini lengthwise. With a small spoon, scoop out the flesh but taking care not to pierce the skin. Continue with the rest of the zucchini and place in a baking dish big enough to fit all the zucchini halves in a single layer. Season the inside flesh with salt and pepper. In the meantime, make the stuffing.
In a pan over medium heat, sauté shallot, garlic and chili in oil until soft. Add ground beef and cook until the pink is gone. Add tomato paste and tamari and cook for a few minutes. Add the spinach and combine until wilted. Season with salt and pepper.
Stuff the zucchini halves with the mixture. Don't be afraid to pile it on. It cooks down a little in the oven. Sprinkle with feta cheese.
Pour 1/4 cup of water in the bottom of the dish to create some steam. Cover with foil and bake for 40 minutes. The last 10 minutes uncovered. It is done when you pierce the zucchini with the tip of a knife and it is tender.
m xo
Stuffed Zucchini
4 small zucchini
1 lb. ground beef
1 shallot, chopped
2 cloves garlic, chopped
1 small red chili (optional)
1 tablespoon tomato paste
2 tablespoons tamari
3-4 handfuls of baby spinach
salt and pepper, to taste
feta cheese
Preheat oven to 350F.
Slice the zucchini lengthwise. With a small spoon, scoop out the flesh but taking care not to pierce the skin. Continue with the rest of the zucchini and place in a baking dish big enough to fit all the zucchini halves in a single layer. Season the inside flesh with salt and pepper. In the meantime, make the stuffing.
In a pan over medium heat, sauté shallot, garlic and chili in oil until soft. Add ground beef and cook until the pink is gone. Add tomato paste and tamari and cook for a few minutes. Add the spinach and combine until wilted. Season with salt and pepper.
Stuff the zucchini halves with the mixture. Don't be afraid to pile it on. It cooks down a little in the oven. Sprinkle with feta cheese.
Pour 1/4 cup of water in the bottom of the dish to create some steam. Cover with foil and bake for 40 minutes. The last 10 minutes uncovered. It is done when you pierce the zucchini with the tip of a knife and it is tender.
m xo
Labels:
Beef
,
Feta
,
Gluten free
,
Healthy
,
Spinach
,
Vegetables
,
Zucchini
Friday, 21 March 2014
Life Changing Loaf of Bread
I really like this bread. I especially like it toasted for breakfast topped it with an egg, whether it's boiled, scrambled or poached. Or with some sliced avocado, sprinkled with salt. But I have to say my favourite is just a shmear of butter and a drizzle of honey, then dipping it my latte. I know weird. But I'm a dipper.
Everything about this recipe screams healthy! Just look at the list of some of the ingredients and a few of their benefits.
Sunflower seeds. Great source of vitamin E, B complex vitamins, folic acid and many essential minerals.
Flax seeds. Great source of fibre.
Hazelnuts and almonds. Rich in dietary fiber, folate, vitamin E and a complete source of energy.
Chia seeds. Rich in fiber, omega fatty acids, calcium and protein.
Psyllium husks. A great source of dietary fibre.
I found this recipe on Pinterest over a year ago and I have been making it ever since. It's from a website called My New Roots by Sarah Britton. She calls it life changing for a few reasons:
1- Easy clean up. She mixes everything in the loaf pan. (I use a bowl to mix the ingredients. I don't mind washing one bowl)
2- No kneading. Just dump everything, stir, wait a couple of hours and bake.
3- You can substitute ingredients with what you have or like.
4- No rising agent.
5- And this really IS a healthy bread!
When I make a loaf of this bread, I slice the whole thing and freeze half of it. Slicing it before freezing it just makes it easier to remove from the freezer one slice at a time if you want.
The recipe calls for a flexible silicon loaf pan but I have read that others used a regular loaf pan, and it turned out fine. But if you want one,(they're pretty cool) I found mine at Fortino's, my local grocery store.
Life Changing Loaf of Bread
1 cup sunflower seeds
1/2 cup flax seeds (I used ground)
1/2 cup hazelnuts or almonds
1 1/2 cups rolled oats
2 tablespoons chia seeds
3 tablespoons psyllium husk powder
1 teaspoon fine sea salt
1 tablespoon maple syrup
3 tablespoons melted coconut oil
1 1/2 cups water
Combine all dry ingredients in a bowl and mix well. Whisk maple syrup, oil and water together and add to dry ingredients. Mix very well until everything is soaked and becomes thick. Put it into a flexible silicon loaf pan and smooth out the top with the back of a spoon. Let it sit out on the counter for at least 2 hours, or all day or overnight. You know the dough is ready to bake if you pull it away from the sides of the pan and it retains its shape
Preheat the oven to 350F. Put the pan in the middle of the oven for 20 minutes. Remove the bread from the pan and place directly on the rack for another 30-40 minutes. The bread is done when you tap it and it sounds hollow.
Store bread in a sealed container for up to 5 days. Freezes well but slice before freezing.
m xo
Everything about this recipe screams healthy! Just look at the list of some of the ingredients and a few of their benefits.
Sunflower seeds. Great source of vitamin E, B complex vitamins, folic acid and many essential minerals.
Flax seeds. Great source of fibre.
Hazelnuts and almonds. Rich in dietary fiber, folate, vitamin E and a complete source of energy.
Chia seeds. Rich in fiber, omega fatty acids, calcium and protein.
Psyllium husks. A great source of dietary fibre.
I found this recipe on Pinterest over a year ago and I have been making it ever since. It's from a website called My New Roots by Sarah Britton. She calls it life changing for a few reasons:
1- Easy clean up. She mixes everything in the loaf pan. (I use a bowl to mix the ingredients. I don't mind washing one bowl)
2- No kneading. Just dump everything, stir, wait a couple of hours and bake.
3- You can substitute ingredients with what you have or like.
4- No rising agent.
5- And this really IS a healthy bread!
When I make a loaf of this bread, I slice the whole thing and freeze half of it. Slicing it before freezing it just makes it easier to remove from the freezer one slice at a time if you want.
The recipe calls for a flexible silicon loaf pan but I have read that others used a regular loaf pan, and it turned out fine. But if you want one,(they're pretty cool) I found mine at Fortino's, my local grocery store.
Life Changing Loaf of Bread
1 cup sunflower seeds
1/2 cup flax seeds (I used ground)
1/2 cup hazelnuts or almonds
1 1/2 cups rolled oats
2 tablespoons chia seeds
3 tablespoons psyllium husk powder
1 teaspoon fine sea salt
1 tablespoon maple syrup
3 tablespoons melted coconut oil
1 1/2 cups water
Combine all dry ingredients in a bowl and mix well. Whisk maple syrup, oil and water together and add to dry ingredients. Mix very well until everything is soaked and becomes thick. Put it into a flexible silicon loaf pan and smooth out the top with the back of a spoon. Let it sit out on the counter for at least 2 hours, or all day or overnight. You know the dough is ready to bake if you pull it away from the sides of the pan and it retains its shape
Preheat the oven to 350F. Put the pan in the middle of the oven for 20 minutes. Remove the bread from the pan and place directly on the rack for another 30-40 minutes. The bread is done when you tap it and it sounds hollow.
Store bread in a sealed container for up to 5 days. Freezes well but slice before freezing.
m xo
Labels:
Bread
,
Healthy
,
Nuts
,
Oats
,
Sunflower Seeds
Subscribe to:
Posts
(
Atom
)