When I think of this salad, I think of the 80's. I think every restaurant had this on their menu back then. But I never had it until years later when an ex-boyfriends mother would serve this salad as a side with dinner. That's another thing that we never did, serve salad on a separate plate, on the side. Growing up, salad was always at the end of the meal on the same plate. Haha, this was totally new to me. I thought it was really cool.
I finally decided to make it as a main meal for last nights dinner and added a poached egg to it. A nice light meal. I adapted this recipe from Mark Bittmans cookbook, How to Cook Everything. Although I did guild the lily a little by adding some crumbled blue cheese to it.
Spinach Salad with Warm Bacon Vinaigrette
(adapted from How to Cook Everything by Mark Bittman)
150 grams baby spinach
2 tablespoons olive oil
5 slices bacon, chopped
1 small shallot, chopped
1 teaspoon Dijon mustard
1/4 cup red wine vinegar
Crumbled blue cheese
2 poached eggs
Heat oil in a skillet over medium-high heat and add chopped bacon. Cook until crispy and remove with a slotted spoon and set aside. Add the chopped shallot and sauté until soft. Stir in the Dijon mustard and red wine vinegar and bring to a boil. Take off the heat.
In a large bowl with the baby spinach, pour the bacon vinaigrette over it and toss until well coated. Sprinkle with the crispy bacon and blue cheese crumbles. Divide in two plates and top with a poached egg on each one.
m xo
Thursday, 27 March 2014
Wednesday, 26 March 2014
Quintessential Pasta Dish...Orecchiette with Sausage and Rapini
Who doesn't love pasta? I know I certainly do! For me, when I think of Sundays, I think about sitting around at the kitchen table with my family, a bowl of pasta and a glass of wine. That has always been our tradition, pasta every Sunday lunch. And now with my mom being away this winter, my sisters and I still try to uphold that tradition, the only difference being that we try out not-so traditional pasta dishes. Not that my mom wouldn't like them, but she LOVES her fettucine she makes from scratch every Sunday.
And so when I came across an article a few weeks ago about Italian pasta dishes that they thought were the most quintessential and iconic we all need to master, I thought I'd start a series and share with you some of my recipes of these classic pasta dishes I grew up making and eating.
Some of the dishes they mentioned were, Spaghetti alla Carbonara, Pasta e Fagioli, Penne alla Vodka, Fettucine Alfredo, Marcella's tomato sauce with onions and butter (recipe here), Ricotta Gnocchi (recipe here) and many more (22 in all) I'm hoping to share with you the next few months (or longer).
The first one is, Orecchiette with Sausage and Rapini.
This is one of my favourite pasta dishes because you have everything in one dish. Pasta, vegetables and meat. So comforting! And it's very versatile because you can use broccoli instead of rapini, turkey or chicken sausage instead of pork or you can make it totally vegetarian, and eliminate the sausage completely and I promise you, it is still amazing!
When I usually make this dish, I cook the pasta and the rapini together. I first throw in the pasta and 2-3 minutes before the pasta is al dente, I throw in the rapini. Not sure if that makes anyone nervous, not knowing when the pasta is almost ready, because the last thing you want is pasta that is over cooked. That is the worst. If you're not sure, I say take it out sooner than later. And that goes for any dried pasta. So this way, you cook your rapini first then your pasta. Can't go wrong.
Orecchiette Pasta with Sausage and Rapini
1 bunch of rapini
3 tablespoons olive oil
1 lb. sweet or spicy pork sausage
3 cloves garlic, chopped
Red chili peppers, to taste
500 grams orecchiette pasta
Salt
Parmesan cheese, grated
Olive oil
Bring a large pot of salted water to a boil.
In the meantime, cut off and throw away the bottom of the rapini that is a little woody. Cut into 1 inch pieces and wash thoroughly. Cook in boiling water until tender. Scoop out with a strainer spoon or spider, drain and set aside. Do not turn off the heat. Bring the water to a boil again and throw in the orecchiettte pasta and cook until al dente. Drain well. Save some of the cooking water.
Meanwhile, remove the sausage from the casing and crumble it. Heat olive oil in a large skillet over medium-high heat. Add the sausage and cook until is lightly browned. Add the chopped garlic and the chili peppers and continue cooking until the garlic is soft and fragrant. Add the cooked rapini and pasta and cooking water and toss until it's all combined. Take off the heat. Sprinkle with parmesan cheese. Drizzle with olive oil and serve.
m xo
And so when I came across an article a few weeks ago about Italian pasta dishes that they thought were the most quintessential and iconic we all need to master, I thought I'd start a series and share with you some of my recipes of these classic pasta dishes I grew up making and eating.
Some of the dishes they mentioned were, Spaghetti alla Carbonara, Pasta e Fagioli, Penne alla Vodka, Fettucine Alfredo, Marcella's tomato sauce with onions and butter (recipe here), Ricotta Gnocchi (recipe here) and many more (22 in all) I'm hoping to share with you the next few months (or longer).
The first one is, Orecchiette with Sausage and Rapini.
This is one of my favourite pasta dishes because you have everything in one dish. Pasta, vegetables and meat. So comforting! And it's very versatile because you can use broccoli instead of rapini, turkey or chicken sausage instead of pork or you can make it totally vegetarian, and eliminate the sausage completely and I promise you, it is still amazing!
When I usually make this dish, I cook the pasta and the rapini together. I first throw in the pasta and 2-3 minutes before the pasta is al dente, I throw in the rapini. Not sure if that makes anyone nervous, not knowing when the pasta is almost ready, because the last thing you want is pasta that is over cooked. That is the worst. If you're not sure, I say take it out sooner than later. And that goes for any dried pasta. So this way, you cook your rapini first then your pasta. Can't go wrong.
Orecchiette Pasta with Sausage and Rapini
1 bunch of rapini
1 lb. sweet or spicy pork sausage
3 cloves garlic, chopped
Red chili peppers, to taste
500 grams orecchiette pasta
Salt
Parmesan cheese, grated
Olive oil
Bring a large pot of salted water to a boil.
In the meantime, cut off and throw away the bottom of the rapini that is a little woody. Cut into 1 inch pieces and wash thoroughly. Cook in boiling water until tender. Scoop out with a strainer spoon or spider, drain and set aside. Do not turn off the heat. Bring the water to a boil again and throw in the orecchiettte pasta and cook until al dente. Drain well. Save some of the cooking water.
Meanwhile, remove the sausage from the casing and crumble it. Heat olive oil in a large skillet over medium-high heat. Add the sausage and cook until is lightly browned. Add the chopped garlic and the chili peppers and continue cooking until the garlic is soft and fragrant. Add the cooked rapini and pasta and cooking water and toss until it's all combined. Take off the heat. Sprinkle with parmesan cheese. Drizzle with olive oil and serve.
Labels:
Pasta
,
Sausage
,
Vegetables
Tuesday, 25 March 2014
Stuffed Zucchini
During the week, I'm always looking for ways to cut down on simple carbs (but not flavour) when I can.This is just a simple recipe for stuffed zucchini that I came up with for last nights dinner. It was very satisfying with a salad.
Stuffed Zucchini
4 small zucchini
2 tablespoons grape seed oil
1 lb. ground beef
1 shallot, chopped
2 cloves garlic, chopped
1 small red chili (optional)
1 tablespoon tomato paste
2 tablespoons tamari
3-4 handfuls of baby spinach
salt and pepper, to taste
feta cheese
Preheat oven to 350F.
Slice the zucchini lengthwise. With a small spoon, scoop out the flesh but taking care not to pierce the skin. Continue with the rest of the zucchini and place in a baking dish big enough to fit all the zucchini halves in a single layer. Season the inside flesh with salt and pepper. In the meantime, make the stuffing.
In a pan over medium heat, sauté shallot, garlic and chili in oil until soft. Add ground beef and cook until the pink is gone. Add tomato paste and tamari and cook for a few minutes. Add the spinach and combine until wilted. Season with salt and pepper.
Stuff the zucchini halves with the mixture. Don't be afraid to pile it on. It cooks down a little in the oven. Sprinkle with feta cheese.
Pour 1/4 cup of water in the bottom of the dish to create some steam. Cover with foil and bake for 40 minutes. The last 10 minutes uncovered. It is done when you pierce the zucchini with the tip of a knife and it is tender.
m xo
Stuffed Zucchini
4 small zucchini
1 lb. ground beef
1 shallot, chopped
2 cloves garlic, chopped
1 small red chili (optional)
1 tablespoon tomato paste
2 tablespoons tamari
3-4 handfuls of baby spinach
salt and pepper, to taste
feta cheese
Preheat oven to 350F.
Slice the zucchini lengthwise. With a small spoon, scoop out the flesh but taking care not to pierce the skin. Continue with the rest of the zucchini and place in a baking dish big enough to fit all the zucchini halves in a single layer. Season the inside flesh with salt and pepper. In the meantime, make the stuffing.
In a pan over medium heat, sauté shallot, garlic and chili in oil until soft. Add ground beef and cook until the pink is gone. Add tomato paste and tamari and cook for a few minutes. Add the spinach and combine until wilted. Season with salt and pepper.
Stuff the zucchini halves with the mixture. Don't be afraid to pile it on. It cooks down a little in the oven. Sprinkle with feta cheese.
Pour 1/4 cup of water in the bottom of the dish to create some steam. Cover with foil and bake for 40 minutes. The last 10 minutes uncovered. It is done when you pierce the zucchini with the tip of a knife and it is tender.
m xo
Labels:
Beef
,
Feta
,
Gluten free
,
Healthy
,
Spinach
,
Vegetables
,
Zucchini
Monday, 24 March 2014
The Winter That Broke My Husband
I'm calling this the winter that broke my husband because he, along with a lot of other people, has had enough of winter. The only difference is, prior to moving to Canada when we got married, he lived in sunny Florida. And up until this year, he never complained or understood how every winter we Canadians complained about how long and cold it was. His thinking regarding winter was, it's here, get used to it, get over it!
This year changed all that! He wants to move back to Florida. I just have to say the word and we would be outta here! Of course I can't leave and he knows that but he keeps trying. Instead of golfing everyday this winter, poor guy has been shovelling snow. Officially, he is a Canadian!!!...no, really. He got his citizenship this past fall.
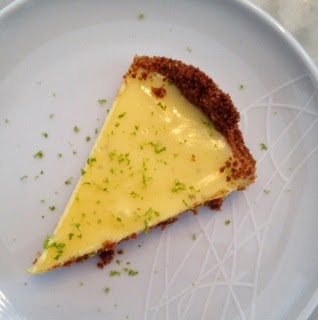
So in honour of my husband, John, I wanted to make something that reminded him of Florida. What better recipe than an American classic, Key Lime pie?!
Key limes are smaller and sweeter than the Persian limes that are found more often in the grocery stores but you can substitute with them.
After doing some research, I found there were two types of Key Lime pie recipes, condensed milk and non condensed milk versions. And "conchs" as Key West locals are called, call the condensed milk version the official version. Why? Because up until the opening of the Overseas Highway through the Keys in 1930, there was no refrigeration and they had to rely on canned condensed milk.
Another controversy is, meringue or whipped cream. I couldn't find the answer to that so I asked my husband what he preferred and he said whipped cream. But alas, just as I was about to serve it, I forgot to whip the cream and decided to serve it naked. Which I have to say turned out for the best because I found the pie rich enough on it's own.
Key Lime Pie
(a Martha Stewart recipe)
1 1/2 cups graham cracker crumbs
6 tablespoons unsalted butter, melted, cooled
3 tablespoons sugar
1 can (300ml) sweetened condensed milk
4 large egg yolks
1/2 cup freshly squeezed Key lime juice (approximately 15-18 Key limes)
Key lime zest, to garnish
Whipped cream, to garnish (optional)
Preheat oven to 375F.
In a bowl, combine graham crackers crumbs, butter and sugar. Press into a 9 inch pie plate or springform pan (that's what I used). Bake for 12 minutes. Remove from oven and cool completely on a wire rack.
Lower oven temperature to 325F.
In a bowl, gently whisk together the condensed milk, egg yolks and Key lime juice. Pour into the cooled crust and bake for 15-17, until the centre sets. Let cool completely on a wire rack.
Before serving, garnish with zest and optional whipped cream.
This year changed all that! He wants to move back to Florida. I just have to say the word and we would be outta here! Of course I can't leave and he knows that but he keeps trying. Instead of golfing everyday this winter, poor guy has been shovelling snow. Officially, he is a Canadian!!!...no, really. He got his citizenship this past fall.
So in honour of my husband, John, I wanted to make something that reminded him of Florida. What better recipe than an American classic, Key Lime pie?!
Key limes are smaller and sweeter than the Persian limes that are found more often in the grocery stores but you can substitute with them.
After doing some research, I found there were two types of Key Lime pie recipes, condensed milk and non condensed milk versions. And "conchs" as Key West locals are called, call the condensed milk version the official version. Why? Because up until the opening of the Overseas Highway through the Keys in 1930, there was no refrigeration and they had to rely on canned condensed milk.
Another controversy is, meringue or whipped cream. I couldn't find the answer to that so I asked my husband what he preferred and he said whipped cream. But alas, just as I was about to serve it, I forgot to whip the cream and decided to serve it naked. Which I have to say turned out for the best because I found the pie rich enough on it's own.
Key Lime Pie
(a Martha Stewart recipe)
1 1/2 cups graham cracker crumbs
6 tablespoons unsalted butter, melted, cooled
3 tablespoons sugar
1 can (300ml) sweetened condensed milk
4 large egg yolks
1/2 cup freshly squeezed Key lime juice (approximately 15-18 Key limes)
Key lime zest, to garnish
Whipped cream, to garnish (optional)
Preheat oven to 375F.
In a bowl, combine graham crackers crumbs, butter and sugar. Press into a 9 inch pie plate or springform pan (that's what I used). Bake for 12 minutes. Remove from oven and cool completely on a wire rack.
Lower oven temperature to 325F.
In a bowl, gently whisk together the condensed milk, egg yolks and Key lime juice. Pour into the cooled crust and bake for 15-17, until the centre sets. Let cool completely on a wire rack.
Before serving, garnish with zest and optional whipped cream.
m xo
Labels:
Baked goods
,
Limes
,
Pies
Friday, 21 March 2014
Life Changing Loaf of Bread
I really like this bread. I especially like it toasted for breakfast topped it with an egg, whether it's boiled, scrambled or poached. Or with some sliced avocado, sprinkled with salt. But I have to say my favourite is just a shmear of butter and a drizzle of honey, then dipping it my latte. I know weird. But I'm a dipper.
Everything about this recipe screams healthy! Just look at the list of some of the ingredients and a few of their benefits.
Sunflower seeds. Great source of vitamin E, B complex vitamins, folic acid and many essential minerals.
Flax seeds. Great source of fibre.
Hazelnuts and almonds. Rich in dietary fiber, folate, vitamin E and a complete source of energy.
Chia seeds. Rich in fiber, omega fatty acids, calcium and protein.
Psyllium husks. A great source of dietary fibre.
I found this recipe on Pinterest over a year ago and I have been making it ever since. It's from a website called My New Roots by Sarah Britton. She calls it life changing for a few reasons:
1- Easy clean up. She mixes everything in the loaf pan. (I use a bowl to mix the ingredients. I don't mind washing one bowl)
2- No kneading. Just dump everything, stir, wait a couple of hours and bake.
3- You can substitute ingredients with what you have or like.
4- No rising agent.
5- And this really IS a healthy bread!
When I make a loaf of this bread, I slice the whole thing and freeze half of it. Slicing it before freezing it just makes it easier to remove from the freezer one slice at a time if you want.
The recipe calls for a flexible silicon loaf pan but I have read that others used a regular loaf pan, and it turned out fine. But if you want one,(they're pretty cool) I found mine at Fortino's, my local grocery store.
Life Changing Loaf of Bread
1 cup sunflower seeds
1/2 cup flax seeds (I used ground)
1/2 cup hazelnuts or almonds
1 1/2 cups rolled oats
2 tablespoons chia seeds
3 tablespoons psyllium husk powder
1 teaspoon fine sea salt
1 tablespoon maple syrup
3 tablespoons melted coconut oil
1 1/2 cups water
Combine all dry ingredients in a bowl and mix well. Whisk maple syrup, oil and water together and add to dry ingredients. Mix very well until everything is soaked and becomes thick. Put it into a flexible silicon loaf pan and smooth out the top with the back of a spoon. Let it sit out on the counter for at least 2 hours, or all day or overnight. You know the dough is ready to bake if you pull it away from the sides of the pan and it retains its shape
Preheat the oven to 350F. Put the pan in the middle of the oven for 20 minutes. Remove the bread from the pan and place directly on the rack for another 30-40 minutes. The bread is done when you tap it and it sounds hollow.
Store bread in a sealed container for up to 5 days. Freezes well but slice before freezing.
m xo
Everything about this recipe screams healthy! Just look at the list of some of the ingredients and a few of their benefits.
Sunflower seeds. Great source of vitamin E, B complex vitamins, folic acid and many essential minerals.
Flax seeds. Great source of fibre.
Hazelnuts and almonds. Rich in dietary fiber, folate, vitamin E and a complete source of energy.
Chia seeds. Rich in fiber, omega fatty acids, calcium and protein.
Psyllium husks. A great source of dietary fibre.
I found this recipe on Pinterest over a year ago and I have been making it ever since. It's from a website called My New Roots by Sarah Britton. She calls it life changing for a few reasons:
1- Easy clean up. She mixes everything in the loaf pan. (I use a bowl to mix the ingredients. I don't mind washing one bowl)
2- No kneading. Just dump everything, stir, wait a couple of hours and bake.
3- You can substitute ingredients with what you have or like.
4- No rising agent.
5- And this really IS a healthy bread!
When I make a loaf of this bread, I slice the whole thing and freeze half of it. Slicing it before freezing it just makes it easier to remove from the freezer one slice at a time if you want.
The recipe calls for a flexible silicon loaf pan but I have read that others used a regular loaf pan, and it turned out fine. But if you want one,(they're pretty cool) I found mine at Fortino's, my local grocery store.
Life Changing Loaf of Bread
1 cup sunflower seeds
1/2 cup flax seeds (I used ground)
1/2 cup hazelnuts or almonds
1 1/2 cups rolled oats
2 tablespoons chia seeds
3 tablespoons psyllium husk powder
1 teaspoon fine sea salt
1 tablespoon maple syrup
3 tablespoons melted coconut oil
1 1/2 cups water
Combine all dry ingredients in a bowl and mix well. Whisk maple syrup, oil and water together and add to dry ingredients. Mix very well until everything is soaked and becomes thick. Put it into a flexible silicon loaf pan and smooth out the top with the back of a spoon. Let it sit out on the counter for at least 2 hours, or all day or overnight. You know the dough is ready to bake if you pull it away from the sides of the pan and it retains its shape
Preheat the oven to 350F. Put the pan in the middle of the oven for 20 minutes. Remove the bread from the pan and place directly on the rack for another 30-40 minutes. The bread is done when you tap it and it sounds hollow.
Store bread in a sealed container for up to 5 days. Freezes well but slice before freezing.
m xo
Labels:
Bread
,
Healthy
,
Nuts
,
Oats
,
Sunflower Seeds
Thursday, 20 March 2014
Shaved Brussels Sprout Salad
I didn't grow up with brussels sprouts but now I love them raw in salads and making different variations of them. I alter them a bit each time by adding a different vegetable and/or changing the cheese and oil. I like the vegetables sliced really thin and have tried to do this with a knife but I can never slice them thin enough. So I use a mandolin. Just be really careful when using one and don't get distracted as I have been known to do and sliced my finger tips many times.
I find the longer this salad sits, the better it is.
Shaved Brussels Sprout Salad
1 lb. brussels sprouts
2-3 celery stalks
1/2 cup marcona almonds, chopped
Shaved parmesan cheese
Juice of 1 lemon
4 tablespoons walnut oil
Salt and pepper, to taste
Remove the outer leaves of the brussels sprouts and slice thinly along with the celery using a mandolin or a knife. Toss with the other ingredients and let sit for at least an hour before serving.
I find the longer this salad sits, the better it is.
Shaved Brussels Sprout Salad
1 lb. brussels sprouts
2-3 celery stalks
1/2 cup marcona almonds, chopped
Shaved parmesan cheese
Juice of 1 lemon
4 tablespoons walnut oil
Salt and pepper, to taste
Remove the outer leaves of the brussels sprouts and slice thinly along with the celery using a mandolin or a knife. Toss with the other ingredients and let sit for at least an hour before serving.
m xo
Labels:
Celery
,
Gluten free
,
Healthy
,
Parmesan Cheese
,
Vegetables
Wednesday, 19 March 2014
Chicken Chili
I looked out the window the other night and noticed the sun shining…then I looked at the clock…then I looked out again. It was 7:30 and still daylight! Wow, I can't tell you how happy that made me feel. I finally started to see the light (no pun intended) at the end of the tunnel. It's amazing how a little sunshine can make you feel. This winter in particular. It has been so loooong. I'm sure we are sick of hearing ourselves complain about it. I know I am.
Today was a beautiful sunny day…sunny but cold, so I wanted to make something warming and comforting. Chili hits the spot for me. The heat from the spices and peppers takes the edge off a cold night.
I used leftover roasted chicken from last nights dinner, but if I hadn't had leftovers, I would have baked off some chicken breasts and thighs.
I like using poblano peppers for this recipe when I can find them. Poblanos are a mild chili pepper originating from Puebla, Mexico. They have a nice smokey flavour. They can have a little kick sometimes, which is nice for people that don't like it too spicy. They tend to have a tougher skin than most peppers so thats why I roasted and peeled them.
I usually do this on the grill outdoors, but again, too cold, so I just placed the whole peppers directly on my gas stove flame. Use tongs to rotate and flip the peppers. You want to keep your eyes on them. When they are completely charred and blistered, place them in a sealed plastic bag or bowl covered with plastic wrap to trap the steam inside. Let them sit for 15 minutes. Then peel and seed the peppers. You can use this method with any pepper.
Chicken Chili
Leftover roasted chicken, chopped
3 tablespoons olive oil
1 large onion, chopped
2-3 cloves garlic, chopped
3 poblano peppers, roasted. peeled and chopped
1 jalapeño pepper, minced
1 teaspoon ground cumin
2 teaspoons chili powder
1/2 teaspoon dried oregano
1 teaspoon salt
19 oz. can white kidney beans, rinsed and drained
3 cups chicken stock or water
1/2 cup chopped cilantro
lime wedges (optional)
Heat olive oil in a large pot over medium-high heat. Add the onion, garlic, poblano peppers, jalapeño, cumin, chili powder, oregano and salt. Sauté until the vegetables are soft and fragrant. Add the chicken, kidney beans and chicken stock or water and turn up the heat a little. Bring to a boil and lower heat. Cover with a lid and simmer for 30 minutes. Stir in the chopped cilantro and serve each bowl with a wedge of lime.
Today was a beautiful sunny day…sunny but cold, so I wanted to make something warming and comforting. Chili hits the spot for me. The heat from the spices and peppers takes the edge off a cold night.
I used leftover roasted chicken from last nights dinner, but if I hadn't had leftovers, I would have baked off some chicken breasts and thighs.
I like using poblano peppers for this recipe when I can find them. Poblanos are a mild chili pepper originating from Puebla, Mexico. They have a nice smokey flavour. They can have a little kick sometimes, which is nice for people that don't like it too spicy. They tend to have a tougher skin than most peppers so thats why I roasted and peeled them.
I usually do this on the grill outdoors, but again, too cold, so I just placed the whole peppers directly on my gas stove flame. Use tongs to rotate and flip the peppers. You want to keep your eyes on them. When they are completely charred and blistered, place them in a sealed plastic bag or bowl covered with plastic wrap to trap the steam inside. Let them sit for 15 minutes. Then peel and seed the peppers. You can use this method with any pepper.
Chicken Chili
Leftover roasted chicken, chopped
3 tablespoons olive oil
1 large onion, chopped
2-3 cloves garlic, chopped
3 poblano peppers, roasted. peeled and chopped
1 jalapeño pepper, minced
1 teaspoon ground cumin
2 teaspoons chili powder
1/2 teaspoon dried oregano
1 teaspoon salt
19 oz. can white kidney beans, rinsed and drained
3 cups chicken stock or water
1/2 cup chopped cilantro
lime wedges (optional)
Heat olive oil in a large pot over medium-high heat. Add the onion, garlic, poblano peppers, jalapeño, cumin, chili powder, oregano and salt. Sauté until the vegetables are soft and fragrant. Add the chicken, kidney beans and chicken stock or water and turn up the heat a little. Bring to a boil and lower heat. Cover with a lid and simmer for 30 minutes. Stir in the chopped cilantro and serve each bowl with a wedge of lime.
m xo
Subscribe to:
Posts
(
Atom
)