I don't know who Gina is but damn, her recipe for Pizzelle are amazing! They're light and crispy and best of all, they have anise in them, which I love. I first came upon this recipe a couple of years ago on Mario Batali's website. Growing up, I wasn't really a fan of pizzelle but as an adult I LOVE these simple, homemade, classic cookies.
This does require a pizzelle maker, which are readily available and range between $40-$70. Not too bad of an investment. I've been using my moms, who's had hers for 30 years now. I love how seasoned it is. Although the ones they make today are non stick as opposed stainless steel. Just make sure it's really hot when you add the batter.
So last night after dinner when it started snowing, I thought let me make snow flakes to go with the snow flakes falling outside. Lol. They do look like snow flakes, right? Perfect for the holiday season.
Gina's Pizzelle
6 eggs
1 cup sugar
3/4 cup vegetable oil
3 cups flour
1 tablespoon baking powder
3 tablespoons anise seeds
In a large bowl, combine the eggs, sugar, and oil and mix until well combined. Add the flour, baking powder and anise seeds and mix together. Set aside at room temperature for 30 minutes.
Heat the pizzelle iron until very hot. Pour 1 1/2-2 tablespoons of batter onto the iron, close it and cook until golden brown. Repeat until all the batter is used.
m xo
Showing posts with label Baked goods. Show all posts
Thursday, 20 November 2014
Tuesday, 18 November 2014
Butternut Squash Galette
It's still officially fall even though you wouldn't know it by looking outside today. Although, I have to say I love this kind of snow. It looks so pretty coming down, all fluffy and white, but nothing has been really sticking to the ground except on the grass and trees. It totally gets me in the mood for the holidays. Anyways, I digress. It's fall and I love cooking and baking with all the squashes available.
This weekend was my brother in law Chris' 40th birthday (I know, so young) and my sister threw him a little cocktail party for a few friends and family and I made a couple different types of crostini. One of them was butternut squash and ricotta, which was dee-lish. So I had some cubed roasted butternut left over and of course a little ricotta and so I decided to make a galette.
This was super easy to throw together, especially with frozen puff pastry. This galette is a lovely balance of savoury from the ricotta and feta with a hint of sweetness from the squash. It made a wonderful lunch today. And would be amazing for a brunch. I also happen to have some smoked mozzarella left over from the rice balls that I made for the party too, which I put in the galette. And I have to say it's the only thing I would change in the recipe. It was good but was a little too strong for the butternut squash, so next time I'm going to use regular mozzarella.
I'm going to freeze the leftover galette for the car ride to Montreal this weekend. Yummy!
Butternut Squash Galette
1 sheet of puff pastry, thawed
1 small butternut squash, peeled, cubed, seasoned with salt and pepper and roasted, about 1 1/2 cups cooked
1 cup ricotta
1/3 cup feta, crumbled
1/2 cup mozzarella, cubed or shredded
1 egg
1/4 teaspoon grated nutmeg
1/2 teaspoon salt
1/2 teaspoon pepper
1 egg, lightly beaten, for the egg wash
Preheat oven to 375F.
Line a baking sheet with parchment. Roll out the puff pastry and cut the edges to form a rounded shape. Mix ricotta, feta, mozzarella, 1 egg, nutmeg, salt and pepper. Mound in the middle of the pastry leaving 1 1/2 inch border all the way around. Top with the butternut squash. Pull pastry up and over the edge of the ricotta and butternut squash, leaving the centre open. With a pastry brush, brush the pastry with egg. Bake for 40-45 minutes. Let cool completely before serving.
m xo
This weekend was my brother in law Chris' 40th birthday (I know, so young) and my sister threw him a little cocktail party for a few friends and family and I made a couple different types of crostini. One of them was butternut squash and ricotta, which was dee-lish. So I had some cubed roasted butternut left over and of course a little ricotta and so I decided to make a galette.
This was super easy to throw together, especially with frozen puff pastry. This galette is a lovely balance of savoury from the ricotta and feta with a hint of sweetness from the squash. It made a wonderful lunch today. And would be amazing for a brunch. I also happen to have some smoked mozzarella left over from the rice balls that I made for the party too, which I put in the galette. And I have to say it's the only thing I would change in the recipe. It was good but was a little too strong for the butternut squash, so next time I'm going to use regular mozzarella.
Butternut Squash Galette
1 sheet of puff pastry, thawed
1 small butternut squash, peeled, cubed, seasoned with salt and pepper and roasted, about 1 1/2 cups cooked
1 cup ricotta
1/3 cup feta, crumbled
1/2 cup mozzarella, cubed or shredded
1 egg
1/4 teaspoon grated nutmeg
1/2 teaspoon salt
1/2 teaspoon pepper
1 egg, lightly beaten, for the egg wash
Preheat oven to 375F.
Line a baking sheet with parchment. Roll out the puff pastry and cut the edges to form a rounded shape. Mix ricotta, feta, mozzarella, 1 egg, nutmeg, salt and pepper. Mound in the middle of the pastry leaving 1 1/2 inch border all the way around. Top with the butternut squash. Pull pastry up and over the edge of the ricotta and butternut squash, leaving the centre open. With a pastry brush, brush the pastry with egg. Bake for 40-45 minutes. Let cool completely before serving.
m xo
Labels:
Baked goods
,
Brunch
,
Ricotta
Thursday, 18 September 2014
Cherry Tomato Crostata
You know, there was a time I was obsessed with Martha Stewart. I loved her and I wanted to be like her. I watched her shows and subscribed to her magazine. I only got rid of the magazines a few years ago, and that's only because my mother was cleaning out her basement and came upon them and didn't want to keep them any more. I don't blame her. I don't know when was the last time I looked through them. Probably 15 years ago.
Anyway, it was during this time in my twenties, that I decided I wanted to perfect the fruit pie. Crust and all. Especially the crust. You see, Martha was baking these beautiful pies that were made from scratch and used fruit that she grew herself on Turkey Hill in Conneticut. Go figure! So I was making and baking pies practically every week. And I think after a few months, I did perfect the pie...I also gained 20 pounds but whatever, I made beautiful pies.
So then I spent my thirties trying to lose the twenty pounds, which meant I stopped making pies. I still make a pie here and there but my crust is not nearly as perfect as it used to be. But I don't mind.
When I came upon this recipe for tomato pie, it called for a crust made from scratch. I debated whether to make it or use an already prepared crust from the frozen section in the grocery store. Ultimately the grocery store won. Martha would be very disappointed. Oh well.
I doubled this recipe because I had a lot of cherry tomatoes from my garden.
Cherry Tomato Crostata
makes one 9inch pie
1 prepared pie crust, thawed
2 pints cherry tomatoes
1/2 cup basil, chopped
1 teaspoon herbs de Provence (optional)
5 1/2 cups grated provolone or fontina cheese
1/2 cup mayo
Preheat oven to 375F.
Mix the cheese, basil and mayo. Spread the mixture over the bottom of the pie shell. Top with the cherry tomatoes and press down. Bake for 35 minutes or until the crust is golden and the cheese is bubbling. Cool for 10 minutes and serve.
Anyway, it was during this time in my twenties, that I decided I wanted to perfect the fruit pie. Crust and all. Especially the crust. You see, Martha was baking these beautiful pies that were made from scratch and used fruit that she grew herself on Turkey Hill in Conneticut. Go figure! So I was making and baking pies practically every week. And I think after a few months, I did perfect the pie...I also gained 20 pounds but whatever, I made beautiful pies.
So then I spent my thirties trying to lose the twenty pounds, which meant I stopped making pies. I still make a pie here and there but my crust is not nearly as perfect as it used to be. But I don't mind.
When I came upon this recipe for tomato pie, it called for a crust made from scratch. I debated whether to make it or use an already prepared crust from the frozen section in the grocery store. Ultimately the grocery store won. Martha would be very disappointed. Oh well.
I doubled this recipe because I had a lot of cherry tomatoes from my garden.
Cherry Tomato Crostata
makes one 9inch pie
1 prepared pie crust, thawed
2 pints cherry tomatoes
1/2 cup basil, chopped
1 teaspoon herbs de Provence (optional)
5 1/2 cups grated provolone or fontina cheese
1/2 cup mayo
Preheat oven to 375F.
Mix the cheese, basil and mayo. Spread the mixture over the bottom of the pie shell. Top with the cherry tomatoes and press down. Bake for 35 minutes or until the crust is golden and the cheese is bubbling. Cool for 10 minutes and serve.
m xo
Labels:
Baked goods
,
Cheese
,
Tomatoes
Wednesday, 3 September 2014
Italian Plum Cake
Boy, for someone who doesn't like to bake too much, I just noticed, I bake a lot!! I never realized how much I baked until I started writing this blog. I mean, as long as the recipe isn't too complicated, like this one, I quite enjoy it...or at least the results of it!
I wanted to bake something our 7th wedding anniversary. Although who needs an excuse for cake, right? And I love anything with fruit and with the little purple plums in season now, I couldn't resist.
I adapted this recipe from Nigella Lawson's, "Nigellissima" cookbook. It called for apples but I obviously used plums and instead of topping the cake with sugar, I crushed a couple of amaretti cookies and sprinkled the cake before baking. I also cut down the sugar by 1/4 cup. As much as I like sweets, I'm not a fan of overly sweet. This was perfect! I can't wait to have another piece in the morning with my coffee.
Italian Plum Cake
adapted from Nigellissima, by Nigella Lawson
8 tablespoons butter, softened
1 2/3 cups flour
2 teaspoons baking powder
Pinch of salt
1/2 cup sugar
2 eggs
Zest of a lemon
1 teaspoon vanilla extract
1/4 cup milk, at room temperature (I used almond milk)
4 plums, pitted and sliced
2 amaretti cookies, crushed, or
1 tablespoon sugar mixed with 1/2 teaspoon cinnamon
Preheat oven to 400F.
Butter a 9 inch springform pan and line with parchment paper.
In a food processor, put the butter, flour, baking powder, salt, sugar, eggs, lemon zest and vanilla extract and blitz until it forms a thick batter. With the motor still running, pour the milk down the funnel.
Pour the batter in the prepared pan and smooth out. Arrange the plums in a pretty pattern on top of the cake batter and sprinkle with the crushed amaretti or the sugar/cinnamon.
Bake for 35-40 minutes until golden or until a toothpick inserted in the middle comes out clean.
Cool for an hour in pan before serving.
I wanted to bake something our 7th wedding anniversary. Although who needs an excuse for cake, right? And I love anything with fruit and with the little purple plums in season now, I couldn't resist.
I adapted this recipe from Nigella Lawson's, "Nigellissima" cookbook. It called for apples but I obviously used plums and instead of topping the cake with sugar, I crushed a couple of amaretti cookies and sprinkled the cake before baking. I also cut down the sugar by 1/4 cup. As much as I like sweets, I'm not a fan of overly sweet. This was perfect! I can't wait to have another piece in the morning with my coffee.
Italian Plum Cake
adapted from Nigellissima, by Nigella Lawson
8 tablespoons butter, softened
1 2/3 cups flour
2 teaspoons baking powder
Pinch of salt
1/2 cup sugar
2 eggs
Zest of a lemon
1 teaspoon vanilla extract
1/4 cup milk, at room temperature (I used almond milk)
4 plums, pitted and sliced
2 amaretti cookies, crushed, or
1 tablespoon sugar mixed with 1/2 teaspoon cinnamon
Preheat oven to 400F.
Butter a 9 inch springform pan and line with parchment paper.
In a food processor, put the butter, flour, baking powder, salt, sugar, eggs, lemon zest and vanilla extract and blitz until it forms a thick batter. With the motor still running, pour the milk down the funnel.
Pour the batter in the prepared pan and smooth out. Arrange the plums in a pretty pattern on top of the cake batter and sprinkle with the crushed amaretti or the sugar/cinnamon.
Bake for 35-40 minutes until golden or until a toothpick inserted in the middle comes out clean.
Cool for an hour in pan before serving.
m xo
Labels:
Baked goods
,
Fruit
Friday, 29 August 2014
Peach Crostata
I bake because I want the end result. I love my sweets. I have a huge sweet tooth. That's no surprise here, It's not a secret. But the thing is, I'm not that great at it. It's really not my thing. I have no patience with the little details when it comes to baking. So it was no surprise when I made this crostata, brought it to a family function and my sister (the baker) started to kill herself laughing.
The recipe calls for using 3/4 of the dough to use as the base and the other 1/4 of the dough to make decorative ropes and top the crostata. Well as you can see from the photo, you can understand why my sister laughed. Hahaha. I can't blame her. It looked funny. I don't know what I was thinking with those ropes...Well, I'll tell you what I was thinking. I was thinking I was too lazy to get my rolling pin and roll out the dough to make lattice, like you see on a lot of pies and crostatas.
But I will tell you, this crostata was delicious! Not overly sweet and easy to put together. Please don't let the look of it deter you from making it. The only thing I would do differently is sprinkle LOTS of powdered sugar on it...to cover up the obvious!!! Hahahahaha!
Peach Crostata
makes one 9 inch crostata
use a pan with removable bottom
1 1/2 cup plus 2 tablespoons of flour
Pinch of salt
1/4 cup sugar
3/4 teaspoon baking powder
Zest of a lemon
1/2 teaspoon vanilla bean paste, or extract
2 eggs, room temperature
4 tablespoons butter, room temperature
1 cup peach jam
2-3 peaches, sliced
Preheat oven to 350F.
Place flour on a work surface and make a well in the middle. Sprinkle the salt, sugar and baking powder and add the lemon zest.
Crack the eggs in the well and using your finger, stir them in to break up the eggs and start incorporating the dry ingredients. Then add the butter and the vanilla and keep stirring until the dough starts to come together. Knead gently until it is smooth.
Take a 1/4 quarter of the dough and set aside for the lattice. Pat the remaining dough into the pie pan and push the edges of the dough about 1/2 inch up the side of the pan to create the crust.
Spoon the jam into onto the crust and spread evenly. Lay the peach slices on top. Take the remaining dough and decorate the pie however you like. Either roll out and make lattice or as I did and pinch off pieces, roll into ropes and place on pie. Bake for 25 minutes. Cool for an hour before cutting into it.
The recipe calls for using 3/4 of the dough to use as the base and the other 1/4 of the dough to make decorative ropes and top the crostata. Well as you can see from the photo, you can understand why my sister laughed. Hahaha. I can't blame her. It looked funny. I don't know what I was thinking with those ropes...Well, I'll tell you what I was thinking. I was thinking I was too lazy to get my rolling pin and roll out the dough to make lattice, like you see on a lot of pies and crostatas.
But I will tell you, this crostata was delicious! Not overly sweet and easy to put together. Please don't let the look of it deter you from making it. The only thing I would do differently is sprinkle LOTS of powdered sugar on it...to cover up the obvious!!! Hahahahaha!
Peach Crostata
makes one 9 inch crostata
use a pan with removable bottom
1 1/2 cup plus 2 tablespoons of flour
Pinch of salt
1/4 cup sugar
3/4 teaspoon baking powder
Zest of a lemon
1/2 teaspoon vanilla bean paste, or extract
2 eggs, room temperature
4 tablespoons butter, room temperature
1 cup peach jam
2-3 peaches, sliced
Preheat oven to 350F.
Place flour on a work surface and make a well in the middle. Sprinkle the salt, sugar and baking powder and add the lemon zest.
Crack the eggs in the well and using your finger, stir them in to break up the eggs and start incorporating the dry ingredients. Then add the butter and the vanilla and keep stirring until the dough starts to come together. Knead gently until it is smooth.
Take a 1/4 quarter of the dough and set aside for the lattice. Pat the remaining dough into the pie pan and push the edges of the dough about 1/2 inch up the side of the pan to create the crust.
Spoon the jam into onto the crust and spread evenly. Lay the peach slices on top. Take the remaining dough and decorate the pie however you like. Either roll out and make lattice or as I did and pinch off pieces, roll into ropes and place on pie. Bake for 25 minutes. Cool for an hour before cutting into it.
Happy Labour Day weekend!
m xo
Labels:
Baked goods
,
Fruit
Wednesday, 9 July 2014
Happy Birthday to Me…Cardamom Carrot Cake!
This year I decided to make my own birthday cake. Strange, you say? Maybe. But think about it. You decide what kind of cake you want, you know all the ingredients that are going into it and then you get to share it with the people you love!
Let me tell you how this came about. My sister Antonella offered to make me my birthday cake and I decided I wanted a cheesecake this year. Which is unusual but I really had a craving for it. She was going to use local raspberries as the topping. Yummy! In the meantime I took a quiz on Facebook, posted by food52, asking "what cake are you?" and I got "Carrot Cake with Cardamom". I do enjoy a nice carrot cake but what I REALLY love most about carrot cake is the cream cheese frosting!!! Sooo good. I bought all the ingredients to make this cake and figured, hey, you can never have too much cake. I would be enjoying the cheesecake and the carrot cake for the next few days. Definitely no complaints here. But then Antonelle got sick so I NEEDED to make my own cake. Hahaha!
The carrot cake is the recipe from food52. I liked it because it has cardamom in it, which I love. I made some adjustments though. The original calls for both white and brown sugar, I only used brown sugar and I cut it down by half a cup. I also replaced I cup of the flour with spelt flour. I didn't use the cream cheese frosting that the recipe called for. It was too much for what I needed so I found one on line from Good Housekeeping. It's the perfect amount and not too sweet. I like my cream cheese frosting on the tangy side.
So for your next birthday, I encourage you to make your own cake and most important, share it with the people you love!!
Carrot Cake with Cardamom
Cake
1 cup brown sugar
2 teaspoons vanilla
4 eggs
4 cups grated carrots
2 cups flour
1 cup spelt flour
2 teaspoons baking powder
1 teaspoon cardamom
1/2 teaspoon cinnamon
1 teaspoon salt
Zest of an orange
3/4 cup vegetable oil
3/4 cup yogurt
Preheat oven to 325F. Grease and flour two 9" cake pans.
In a bowl, beat the sugar and the eggs until light yellow. Add vanilla. In a large bowl, combine the grated carrots, flours, baking powder, cardamom, cinnamon, salt and orange zest. Toss to coat. Add the oil and yogurt and stir until combined. Pour batter evenly in the pans. Bake until golden, about 50 minutes. Cool completely. Frost with Cream Cheese Frosting.
Cream Cheese Frosting
1/4 cup butter, softened
400g. cream cheese, softened
2 teaspoons vanilla
1 1/2 cups confectioner's sugar
In a large bowl, with a mixer or by hand, beat butter, cream cheese, and vanilla until light and fluffy. Add the confectioner's sugar until blended and light and fluffy.
m xo
Let me tell you how this came about. My sister Antonella offered to make me my birthday cake and I decided I wanted a cheesecake this year. Which is unusual but I really had a craving for it. She was going to use local raspberries as the topping. Yummy! In the meantime I took a quiz on Facebook, posted by food52, asking "what cake are you?" and I got "Carrot Cake with Cardamom". I do enjoy a nice carrot cake but what I REALLY love most about carrot cake is the cream cheese frosting!!! Sooo good. I bought all the ingredients to make this cake and figured, hey, you can never have too much cake. I would be enjoying the cheesecake and the carrot cake for the next few days. Definitely no complaints here. But then Antonelle got sick so I NEEDED to make my own cake. Hahaha!
The carrot cake is the recipe from food52. I liked it because it has cardamom in it, which I love. I made some adjustments though. The original calls for both white and brown sugar, I only used brown sugar and I cut it down by half a cup. I also replaced I cup of the flour with spelt flour. I didn't use the cream cheese frosting that the recipe called for. It was too much for what I needed so I found one on line from Good Housekeeping. It's the perfect amount and not too sweet. I like my cream cheese frosting on the tangy side.
So for your next birthday, I encourage you to make your own cake and most important, share it with the people you love!!
Cake
1 cup brown sugar
2 teaspoons vanilla
4 eggs
4 cups grated carrots
2 cups flour
1 cup spelt flour
2 teaspoons baking powder
1 teaspoon cardamom
1/2 teaspoon cinnamon
1 teaspoon salt
Zest of an orange
3/4 cup vegetable oil
3/4 cup yogurt
Preheat oven to 325F. Grease and flour two 9" cake pans.
In a bowl, beat the sugar and the eggs until light yellow. Add vanilla. In a large bowl, combine the grated carrots, flours, baking powder, cardamom, cinnamon, salt and orange zest. Toss to coat. Add the oil and yogurt and stir until combined. Pour batter evenly in the pans. Bake until golden, about 50 minutes. Cool completely. Frost with Cream Cheese Frosting.
Cream Cheese Frosting
1/4 cup butter, softened
400g. cream cheese, softened
2 teaspoons vanilla
1 1/2 cups confectioner's sugar
In a large bowl, with a mixer or by hand, beat butter, cream cheese, and vanilla until light and fluffy. Add the confectioner's sugar until blended and light and fluffy.
m xo
Labels:
Baked goods
,
Carrots
,
Cheese
Wednesday, 14 May 2014
Espresso Almond Cookies
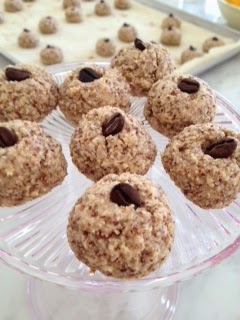
Thank goodness I made these cookies the week before the communion and just stuck them in the freezer. All I had to do was take them out the night before. I got this recipe from the blog, The Italian Dish and they have become one of my go-to cookie recipes. It's SUPER easy. Right up my alley. They also happen to be gluten free.
Espresso Almond Cookies
(from The Italian Dish)
3 tablespoons espresso coffee
3 cups ground almonds
1 cup sugar
3 egg whites
A pinch of salt
Whole coffee beans for garnish
Preheat oven to 350F. Line a baking sheet with parchment paper.
In a bowl, mix together the ground almonds, coffee, sugar, egg whites and salt to form a paste.
Roll the mixture into 1 1/2 inch balls and place on baking sheet. Top each ball with an espresso bean.
Bake the cookies for 15-20 minutes or until slightly firm to the touch and golden brown on the bottom.
Cool and store in an airtight container.

m xo
Labels:
Almonds
,
Baked goods
,
Gluten free
Wednesday, 30 April 2014
Baked Polenta
I have been craving polenta for a while now, but because John doesn't like polenta, I haven't really rushed to make to it, until today. I cheated a little and bought the prepared polenta in the tube-y thingy that you get in the grocery store. I have to say, that stuff is sooo convenient. It's pretty amazing. I just sliced it up, spooned some sauce over, sprinkled some cheese on it and popped it in the oven. I prepared my lunch and had it on the table in 30 minutes. How fabulous is that?
I made a salsa cruda (raw) instead of a cooked sauce. I wanted it to taste light. I didn't give you any amounts for this recipe because thats totally up to you and how many people you're feeding. I made the whole tube and it was enough for 2 people, but since it was only me, I have leftovers for lunch tomorrow. Lucky for me!
Baked Polenta with Salsa Cruda
Prepared polenta in a tube
Salsa cruda, recipe below
Shredded mozzarella
Olive oil
Butter, to grease baking dish
Preheat oven to 375F. Butter a baking dish with butter. Slice the polenta into 1/2 inch rounds and layer in pan, overlapping a little. Spoon over the salsa cruda and sprinkle evenly with mozzarella. Drizzle with olive oil and bake for 20 minutes until bubbly and golden.
Salsa Cruda
Fresh, ripe tomatoes, chopped
Garlic, minced
Olive oil
Salt and pepper, to taste
Mix together and set aside.
m xo
I made a salsa cruda (raw) instead of a cooked sauce. I wanted it to taste light. I didn't give you any amounts for this recipe because thats totally up to you and how many people you're feeding. I made the whole tube and it was enough for 2 people, but since it was only me, I have leftovers for lunch tomorrow. Lucky for me!
Baked Polenta with Salsa Cruda
Prepared polenta in a tube
Salsa cruda, recipe below
Shredded mozzarella
Olive oil
Butter, to grease baking dish
Preheat oven to 375F. Butter a baking dish with butter. Slice the polenta into 1/2 inch rounds and layer in pan, overlapping a little. Spoon over the salsa cruda and sprinkle evenly with mozzarella. Drizzle with olive oil and bake for 20 minutes until bubbly and golden.
Fresh, ripe tomatoes, chopped
Garlic, minced
Olive oil
Salt and pepper, to taste
Mix together and set aside.
m xo
Labels:
Baked goods
,
Cheese
,
Gluten free
,
Polenta
,
Tomatoes
Tuesday, 29 April 2014
Cheesy Quinoa Muffins
Ok, so these muffins came together like the perfect storm. I pinned them a while ago and have been wanting to make them for quite a while but just never got around to it…until today. I looked in my refrigerator and had EVERYTHING. I didn't have to substitute anything. Those who have been following me know that I do a lot substituting when I'm in the kitchen and sometimes it's not even that I don't have a certain ingredient, it's just that I want to try something different. But this time I did exactly what the recipe called for, and they were great! I think these would make a nice picnic fare. Or for lunch, with a salad.
Just a little tip that I think would help. When you take them out of the oven, cool them completely before taking them out of the muffin tin. They stuck to the pan a little when I tried to take them when they were still warm.
Cheesy Broccoli Quinoa Muffins
2 cups cooked quinoa
1 small broccoli, cooked and chopped
2 cups shredded cheddar cheese
3 green onions, chopped
2 tablespoons sriracha
3 eggs
1 teaspoon salt
1/2 teaspoon pepper
Preheat oven to 350F. Generously grease a 12 cup muffin pan.
Mix everything together and fill muffin pan. Bake for 45 minutes until golden. Cool in pan before removing from the pan.
Just a little tip that I think would help. When you take them out of the oven, cool them completely before taking them out of the muffin tin. They stuck to the pan a little when I tried to take them when they were still warm.
Cheesy Broccoli Quinoa Muffins
2 cups cooked quinoa
1 small broccoli, cooked and chopped
2 cups shredded cheddar cheese
3 green onions, chopped
2 tablespoons sriracha
3 eggs
1 teaspoon salt
1/2 teaspoon pepper
Preheat oven to 350F. Generously grease a 12 cup muffin pan.
Mix everything together and fill muffin pan. Bake for 45 minutes until golden. Cool in pan before removing from the pan.
m xo
Labels:
Baked goods
,
Broccoli
,
Cheese
,
Gluten free
,
Healthy
,
Quinoa
Tuesday, 22 April 2014
Grape Focaccia
I usually make this focaccia in the fall months when the moscato grapes are in season and local. It's one of my favourite focaccia's to snack on. Great with a nice piece of parmesan cheese. But I couldn't resist making it today after I saw and bought moscato grapes at the grocery store. The moscato grape is a little sweeter than most grapes and that's why it also makes a nice dessert wine, which btw, I also love!
The dough for this focaccia is a little less dense than my pizza dough. It's a little softer and more tender. I find it produces a dough that is light and airy. I don't even knead it. I just mix with my hands until the flour and water are combined. It's a very forgiving dough recipe that my mom always made.You can definitely use this dough for pizza too.
I made my dough the night before and left it on the counter at room temperature until the next day when I was ready to stretch it out in my pan. You can also make it in the morning, the day of. I used a 12x17 jelly roll pan.
Moscato Grape Focaccia
For the Dough
2 teaspoon dry yeast
1 cup warm water
1 teaspoon honey
4 cups all purpose flour
2 teaspoons salt
2 cups water
olive oil
For the Topping
Moscato grapes
1/4 cup olive oil
1 tablespoon sugar
1 tablespoon rosemary, finely chopped
Dissolve the yeast and honey in the warm water and let stand for 10 minutes. The yeast should become foamy. Place the flour in a large enough bowl that the dough can double in size. Mix in the salt. Pour the yeast in the flour and start pouring in the water a little at a time. You might not need all the water. Using your hands, mix until the dough is soft and sticky. Drizzle a little olive oil on the top and cover with plastic wrap and a tea towel. Place in a warm place for at least 2 hours or overnight, until double in size.
When the dough is ready, use your fingers and stretch it out in a greased jelly roll pan. Let it sit for 45 minutes. In the meantime, make the topping.
Preheat oven to 400F. In a bowl, combine the grapes, olive oil, sugar and rosemary. Spread on dough and let it sit for 30 minutes. Place in oven and bake for 1 hour or until a nice golden colour. Serve warm or at room temperature.
m xo
The dough for this focaccia is a little less dense than my pizza dough. It's a little softer and more tender. I find it produces a dough that is light and airy. I don't even knead it. I just mix with my hands until the flour and water are combined. It's a very forgiving dough recipe that my mom always made.You can definitely use this dough for pizza too.
I made my dough the night before and left it on the counter at room temperature until the next day when I was ready to stretch it out in my pan. You can also make it in the morning, the day of. I used a 12x17 jelly roll pan.
Moscato Grape Focaccia
For the Dough
2 teaspoon dry yeast
1 cup warm water
1 teaspoon honey
4 cups all purpose flour
2 teaspoons salt
2 cups water
olive oil
For the Topping
Moscato grapes
1/4 cup olive oil
1 tablespoon sugar
1 tablespoon rosemary, finely chopped
Dissolve the yeast and honey in the warm water and let stand for 10 minutes. The yeast should become foamy. Place the flour in a large enough bowl that the dough can double in size. Mix in the salt. Pour the yeast in the flour and start pouring in the water a little at a time. You might not need all the water. Using your hands, mix until the dough is soft and sticky. Drizzle a little olive oil on the top and cover with plastic wrap and a tea towel. Place in a warm place for at least 2 hours or overnight, until double in size.
When the dough is ready, use your fingers and stretch it out in a greased jelly roll pan. Let it sit for 45 minutes. In the meantime, make the topping.
Preheat oven to 400F. In a bowl, combine the grapes, olive oil, sugar and rosemary. Spread on dough and let it sit for 30 minutes. Place in oven and bake for 1 hour or until a nice golden colour. Serve warm or at room temperature.
m xo
Labels:
Appetizer
,
Baked goods
,
Fruit
,
Rosemary
Wednesday, 9 April 2014
Chocolate Brownie Yogurt Muffins
I made these muffins with my niece Chloe when she was at my house one afternoon. I don't get spend a lot of time with her and I know that she has been wanting to come by and cook or bake with me, so we decided to make muffins.
I have to tell you, we ended up making 2 types of muffins. The first batch of muffins were Chai Chocolate Chip muffins (recipe in a few days). They usually contain almonds but because Chloe is allergic to nuts, I left them out until she gently pointed out that I used almond milk instead of cows milk. Oh Man! I can't believe I did that! I thought I was so careful. Thank goodness she noticed. Sweet kid!
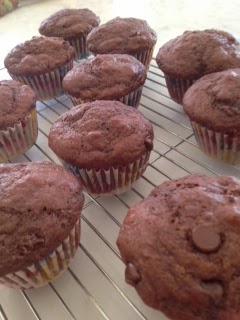
So we decided to make these Chocolate Brownie Yogurt Muffins (no nuts, I promise). I got this recipe from a quinoa cookbook that I have, although I made many alterations. First of all, I didn't have quinoa flour- I used regular all purpose. Second, I didn't have sour cream- I used Greek yogurt and third, I didn't include the toasted nuts, for obdvious reasons. But I have to say, even with all the changes I made, they turned out pretty good. They're not too sweet because of the cocoa powder and they are really moist because of the yogurt. Pretty impressive. The kids and the adults liked them. I will definitely make them again!
My guest photographer for this post is Chloe LeBlanc. She's got a great eye!
Chocolate Brownie Yogurt Muffins
(loosely adapted from Quinoa Revolution by Patricia Green and Carolyn Hemming)
1 1/4 cups all purpose flour
1/2 cup, unsweetened cocoa powder, sifted
1/2 cup sugar
2 1/2 teaspoons baking powder
1/2 teaspoon baking soda
1/2 teaspoon salt
1 large egg
1 cup Greek yogurt
3/4 cup milk
1/3 cup grape seed oil
1 teaspoon vanilla extract
1/4 cup chocolate chips
Preheat oven to 400F. Place paper liners in a 12 cup muffin pan.
In a large bowl, mix together the flour, cocoa powder, baking powder, baking soda and salt. Set aside. In a medium bowl, whisk together the egg and sugar until combined. Stir in the yogurt, milk, grape seed oil, and vanilla extract. Add to the flour mixture and stir until combined.. Stir in the chocolate chips. Divide the batter evenly among the muffin pan.
Bake for 15 minutes, or until a toothpick inserted in the centre of the muffin comes out clean.
m xo
I have to tell you, we ended up making 2 types of muffins. The first batch of muffins were Chai Chocolate Chip muffins (recipe in a few days). They usually contain almonds but because Chloe is allergic to nuts, I left them out until she gently pointed out that I used almond milk instead of cows milk. Oh Man! I can't believe I did that! I thought I was so careful. Thank goodness she noticed. Sweet kid!
So we decided to make these Chocolate Brownie Yogurt Muffins (no nuts, I promise). I got this recipe from a quinoa cookbook that I have, although I made many alterations. First of all, I didn't have quinoa flour- I used regular all purpose. Second, I didn't have sour cream- I used Greek yogurt and third, I didn't include the toasted nuts, for obdvious reasons. But I have to say, even with all the changes I made, they turned out pretty good. They're not too sweet because of the cocoa powder and they are really moist because of the yogurt. Pretty impressive. The kids and the adults liked them. I will definitely make them again!
My guest photographer for this post is Chloe LeBlanc. She's got a great eye!
Chocolate Brownie Yogurt Muffins
(loosely adapted from Quinoa Revolution by Patricia Green and Carolyn Hemming)
1 1/4 cups all purpose flour
1/2 cup, unsweetened cocoa powder, sifted
1/2 cup sugar
2 1/2 teaspoons baking powder
1/2 teaspoon baking soda
1/2 teaspoon salt
1 large egg
1 cup Greek yogurt
3/4 cup milk
1/3 cup grape seed oil
1 teaspoon vanilla extract
1/4 cup chocolate chips
Preheat oven to 400F. Place paper liners in a 12 cup muffin pan.
In a large bowl, mix together the flour, cocoa powder, baking powder, baking soda and salt. Set aside. In a medium bowl, whisk together the egg and sugar until combined. Stir in the yogurt, milk, grape seed oil, and vanilla extract. Add to the flour mixture and stir until combined.. Stir in the chocolate chips. Divide the batter evenly among the muffin pan.
Bake for 15 minutes, or until a toothpick inserted in the centre of the muffin comes out clean.
m xo
Labels:
Baked goods
,
Chocolate
,
Yogurt
Monday, 31 March 2014
Loaded with Chips, Chocolate Chip Cookies
Every year in April, the staff and everyone at The Wild Strawberry Salon raises money for WaterCan in honour of Earth month. WaterCan is a charity that provides clean drinking water for the world's poorest people. We take pride in doing this by raffling tickets for great prizes that are donated to us and having bake sales. So this year to kick start the campaign, I thought I would make chocolate chip cookies because who doesn't like chocolate chip cookies?
This is one of my favourite chocolate chip cookie recipes ever. I have been making them for years. It's my go-to recipe. They're easy to make, loaded with chocolate chips, not too hard, not too soft and you can use any nut you like. I like walnuts. You can also omit them.
They are from a cookbook I've had on my book shelf for many years called "Cookies Unlimited" by Nick Malgieri, who I used to love watching on the Food Network when it first aired many years ago. I've made quite a few of the recipes in this book and they have always turned out great and I can't say that about many other cookbook recipes that I have tried.
Chocolate Chip Cookies
(recipe by Nick Malgieri from "Cookies Unlimited)
1 1/4 cups all purpose flour
1/2 teaspoon salt
1/2 teaspoon baking soda
8 tablespoons (1 stick) unsalted butter
1/2 cup brown sugar
1/4 cup granulated sugar
1 large egg
1 teaspoon vanilla extract
2 cups semisweet chocolate chips
3/4 cup nuts, coursley chopped (optional)
Preheat oven to 375F.
In a bowl, combine the flour, salt and baking soda; mix well.
In a bowl of standing mixer, beat together the butter and both sugars until combined, then beat in the egg and vanilla until smooth. Reduce the speed of the mixer and add the flour mixture, the chocolate chips and the optional nuts.
Drop teaspoonfuls of the dough on parchment lined cookie sheets, 2 inches apart. Bake the cookies 10-12 minutes or until golden and firm. Slide onto a cooling rack.
This is one of my favourite chocolate chip cookie recipes ever. I have been making them for years. It's my go-to recipe. They're easy to make, loaded with chocolate chips, not too hard, not too soft and you can use any nut you like. I like walnuts. You can also omit them.
They are from a cookbook I've had on my book shelf for many years called "Cookies Unlimited" by Nick Malgieri, who I used to love watching on the Food Network when it first aired many years ago. I've made quite a few of the recipes in this book and they have always turned out great and I can't say that about many other cookbook recipes that I have tried.
Chocolate Chip Cookies
(recipe by Nick Malgieri from "Cookies Unlimited)
1/2 teaspoon salt
1/2 teaspoon baking soda
8 tablespoons (1 stick) unsalted butter
1/2 cup brown sugar
1/4 cup granulated sugar
1 large egg
1 teaspoon vanilla extract
2 cups semisweet chocolate chips
3/4 cup nuts, coursley chopped (optional)
Preheat oven to 375F.
In a bowl, combine the flour, salt and baking soda; mix well.
In a bowl of standing mixer, beat together the butter and both sugars until combined, then beat in the egg and vanilla until smooth. Reduce the speed of the mixer and add the flour mixture, the chocolate chips and the optional nuts.
Drop teaspoonfuls of the dough on parchment lined cookie sheets, 2 inches apart. Bake the cookies 10-12 minutes or until golden and firm. Slide onto a cooling rack.
m xo
Labels:
Baked goods
,
Chocolate
,
Nuts
Monday, 24 March 2014
The Winter That Broke My Husband
I'm calling this the winter that broke my husband because he, along with a lot of other people, has had enough of winter. The only difference is, prior to moving to Canada when we got married, he lived in sunny Florida. And up until this year, he never complained or understood how every winter we Canadians complained about how long and cold it was. His thinking regarding winter was, it's here, get used to it, get over it!
This year changed all that! He wants to move back to Florida. I just have to say the word and we would be outta here! Of course I can't leave and he knows that but he keeps trying. Instead of golfing everyday this winter, poor guy has been shovelling snow. Officially, he is a Canadian!!!...no, really. He got his citizenship this past fall.
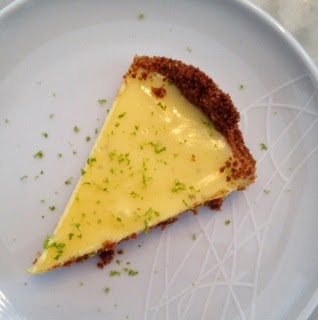
So in honour of my husband, John, I wanted to make something that reminded him of Florida. What better recipe than an American classic, Key Lime pie?!
Key limes are smaller and sweeter than the Persian limes that are found more often in the grocery stores but you can substitute with them.
After doing some research, I found there were two types of Key Lime pie recipes, condensed milk and non condensed milk versions. And "conchs" as Key West locals are called, call the condensed milk version the official version. Why? Because up until the opening of the Overseas Highway through the Keys in 1930, there was no refrigeration and they had to rely on canned condensed milk.
Another controversy is, meringue or whipped cream. I couldn't find the answer to that so I asked my husband what he preferred and he said whipped cream. But alas, just as I was about to serve it, I forgot to whip the cream and decided to serve it naked. Which I have to say turned out for the best because I found the pie rich enough on it's own.
Key Lime Pie
(a Martha Stewart recipe)
1 1/2 cups graham cracker crumbs
6 tablespoons unsalted butter, melted, cooled
3 tablespoons sugar
1 can (300ml) sweetened condensed milk
4 large egg yolks
1/2 cup freshly squeezed Key lime juice (approximately 15-18 Key limes)
Key lime zest, to garnish
Whipped cream, to garnish (optional)
Preheat oven to 375F.
In a bowl, combine graham crackers crumbs, butter and sugar. Press into a 9 inch pie plate or springform pan (that's what I used). Bake for 12 minutes. Remove from oven and cool completely on a wire rack.
Lower oven temperature to 325F.
In a bowl, gently whisk together the condensed milk, egg yolks and Key lime juice. Pour into the cooled crust and bake for 15-17, until the centre sets. Let cool completely on a wire rack.
Before serving, garnish with zest and optional whipped cream.
This year changed all that! He wants to move back to Florida. I just have to say the word and we would be outta here! Of course I can't leave and he knows that but he keeps trying. Instead of golfing everyday this winter, poor guy has been shovelling snow. Officially, he is a Canadian!!!...no, really. He got his citizenship this past fall.
So in honour of my husband, John, I wanted to make something that reminded him of Florida. What better recipe than an American classic, Key Lime pie?!
Key limes are smaller and sweeter than the Persian limes that are found more often in the grocery stores but you can substitute with them.
After doing some research, I found there were two types of Key Lime pie recipes, condensed milk and non condensed milk versions. And "conchs" as Key West locals are called, call the condensed milk version the official version. Why? Because up until the opening of the Overseas Highway through the Keys in 1930, there was no refrigeration and they had to rely on canned condensed milk.
Another controversy is, meringue or whipped cream. I couldn't find the answer to that so I asked my husband what he preferred and he said whipped cream. But alas, just as I was about to serve it, I forgot to whip the cream and decided to serve it naked. Which I have to say turned out for the best because I found the pie rich enough on it's own.
Key Lime Pie
(a Martha Stewart recipe)
1 1/2 cups graham cracker crumbs
6 tablespoons unsalted butter, melted, cooled
3 tablespoons sugar
1 can (300ml) sweetened condensed milk
4 large egg yolks
1/2 cup freshly squeezed Key lime juice (approximately 15-18 Key limes)
Key lime zest, to garnish
Whipped cream, to garnish (optional)
Preheat oven to 375F.
In a bowl, combine graham crackers crumbs, butter and sugar. Press into a 9 inch pie plate or springform pan (that's what I used). Bake for 12 minutes. Remove from oven and cool completely on a wire rack.
Lower oven temperature to 325F.
In a bowl, gently whisk together the condensed milk, egg yolks and Key lime juice. Pour into the cooled crust and bake for 15-17, until the centre sets. Let cool completely on a wire rack.
Before serving, garnish with zest and optional whipped cream.
m xo
Labels:
Baked goods
,
Limes
,
Pies
Wednesday, 26 February 2014
Spinach Ricotta Pie
We usually have lunch at my mothers every Sunday, and it always includes a pasta and some sort of meat (usually meatballs in sauce) but since she has become a snowbird this year, sadly we have to fend for ourselves. Can you believe that?! Hahaha! Just kidding.
So for this Sunday's lunch I decided to make a spinach pie. Well actually, we had to have it for dinner because I forgot you have to thaw phyllo dough for a few hours.
I usually make this pie with an olive oil based pie crust but I didn't feel like a doughy crust so I decided to use phyllo instead. I only used 3 sheets, so if you're trying to cut back on carbs, this is perfect but you can use more if you want a flakier crust. And a tip I got from my Greek friend, Lena, who got it from her grandmother, sprinkle a few droplets of water on the phyllo before baking. It makes it a little crispier. Thanks Lena!
The leftovers were great for breakfast.
Spinach Ricotta Pie
8 oz. bag of spinach (more or less)
2 tablespoons olive oil
1 shallot, chopped
2 cloves garlic, chopped
475g ricotta
2 eggs
1/2 cup grated parmesan cheese
zest and juice of a lemon
1 teaspoon salt
1/2 teaspoon pepper
nutmeg to taste
1 tablespoon bread crumbs
3 sheets phyllo dough
olive oil to drizzle on the phyllo dough
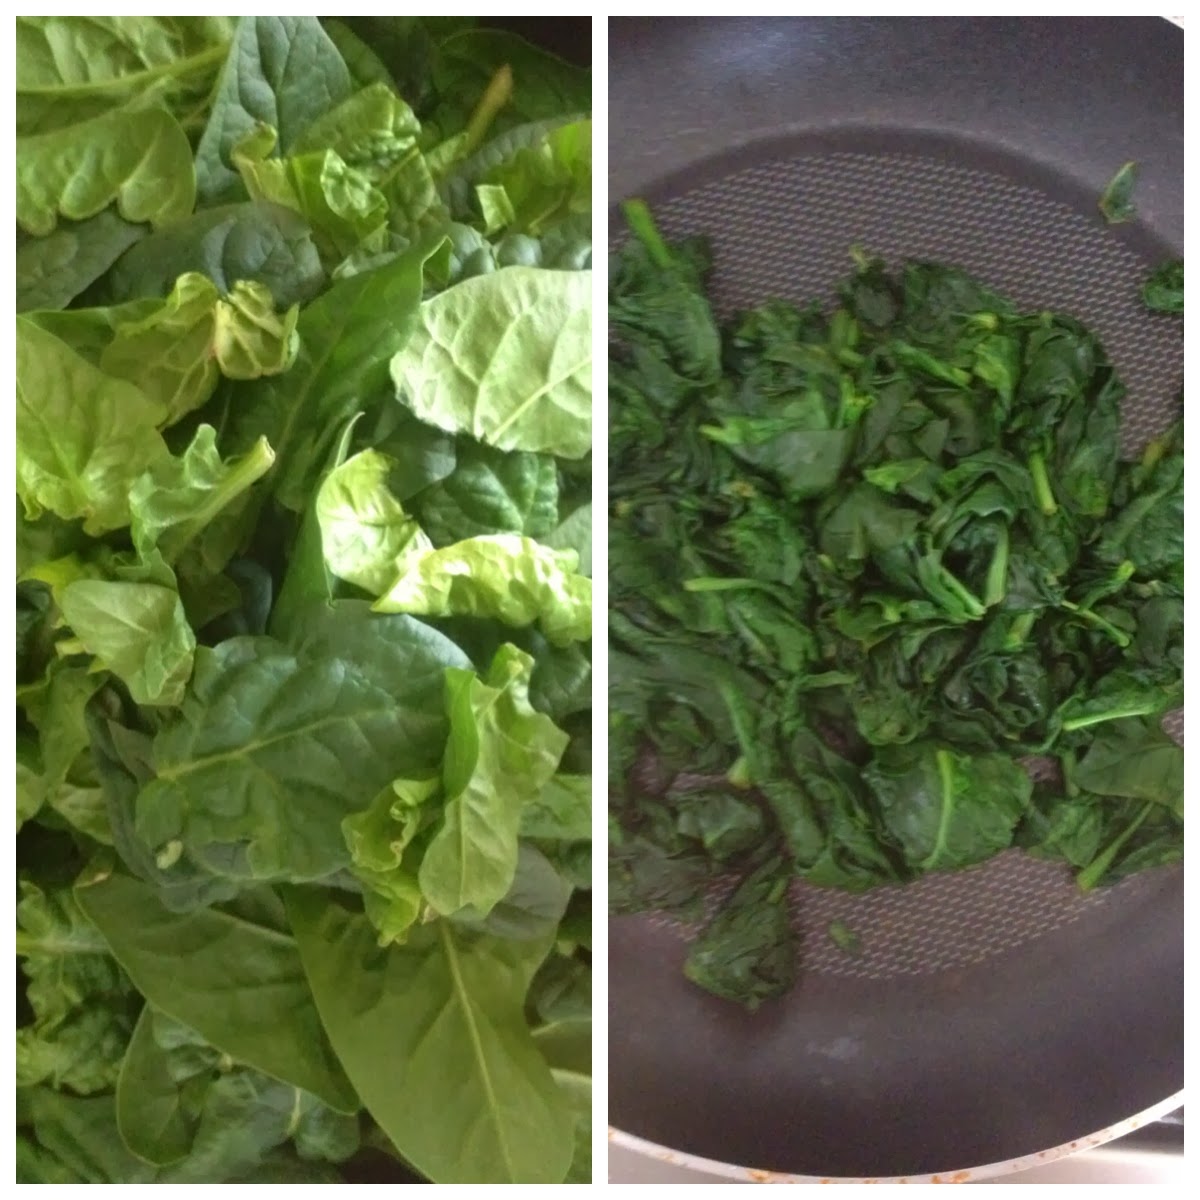
Preheat oven to 350F. On medium heat put the spinach in a pan with a splash of water. Don't worry if the pan doesn't seem big enough, as the spinach wilts down, just add more spinach. Transfer to a cutting board, let cool and chop.
In the same pan, sautƩ garlic and shallot in olive oil until soft. Let cool.
In a bowl, combine spinach, sautƩed onion and garlic, eggs, ricotta, parmesan cheese, zest and juice of lemon, salt, pepper and nutmeg.
m xo
So for this Sunday's lunch I decided to make a spinach pie. Well actually, we had to have it for dinner because I forgot you have to thaw phyllo dough for a few hours.
I usually make this pie with an olive oil based pie crust but I didn't feel like a doughy crust so I decided to use phyllo instead. I only used 3 sheets, so if you're trying to cut back on carbs, this is perfect but you can use more if you want a flakier crust. And a tip I got from my Greek friend, Lena, who got it from her grandmother, sprinkle a few droplets of water on the phyllo before baking. It makes it a little crispier. Thanks Lena!
The leftovers were great for breakfast.
8 oz. bag of spinach (more or less)
2 tablespoons olive oil
1 shallot, chopped
2 cloves garlic, chopped
475g ricotta
2 eggs
1/2 cup grated parmesan cheese
zest and juice of a lemon
1 teaspoon salt
1/2 teaspoon pepper
nutmeg to taste
1 tablespoon bread crumbs
3 sheets phyllo dough
olive oil to drizzle on the phyllo dough
Preheat oven to 350F. On medium heat put the spinach in a pan with a splash of water. Don't worry if the pan doesn't seem big enough, as the spinach wilts down, just add more spinach. Transfer to a cutting board, let cool and chop.
In the same pan, sautƩ garlic and shallot in olive oil until soft. Let cool.
In a bowl, combine spinach, sautƩed onion and garlic, eggs, ricotta, parmesan cheese, zest and juice of lemon, salt, pepper and nutmeg.
In an 11inch tart pan with a removable bottom, place a sheet of phyllo and brush with olive oil. The phyllo will probably hang over the pan. Repeat with another 2 sheets. After brushing the 3rd sheet of phyllo, sprinkle with the breadcrumbs. Spoon in the filling and fold over the hanging phyllo all around the pie. Sprinkle some water and drizzle the dough with a little olive oil. Bake for 50 minutes. Cool for 10 minutes and remove the ring around the pie.
![]() | ![]() |
m xo
Labels:
Baked goods
,
Breakfast
,
Brunch
,
Eggs
,
Lemons
,
Parmesan Cheese
,
Phyllo Dough
,
Ricotta
,
Spinach
Friday, 17 January 2014
My new mug with Fresh Cranberry, Lemon, Lime Scones
I came home from work the other day and my husband had a surprise for me! Who doesn't like surprises?!
He got me a coffee mug with MY cucinamarisa logo on it. He is so adorable! He has been so supportive and patient with my new blogging adventure. Example: I'll serve the dish that I'm about to blog and the poor man is just about to dig in and I'll yell "STOP!". I forgot to photograph the recipe. Hahaha! I would find this very difficult without his encouragement.
And then of course there are all the computer challenges. He's teaching me as I go along and I have to say I'm really enjoying it. It's given me another creative outlet although I still have a lot to learn.
I really wanted to show off my new mug with you guys but I couldn't just take a picture of it sitting all by itself. How boring would that be? So I decided to bake these scones.
I had seen this particular recipe on the blog Joy The Baker and I liked it because A: it was easy and B: I had a huge bag of fresh cranberries that I bought at Costco. Also, they are not too sweet. Perfect with a cup of tea.
Fresh Cranberry, Lemon, Lime Biscuits
3 cups flour
2 1/2 teaspoons baking powder
1/2 teaspoon baking soda
pinch of ground ginger
3/4 teaspoon salt
1/4 cup sugar
3/4 cup cold unsalted butter, cubed
1 large egg, lightly beaten
3/4 cup buttermilk (I used almond milk)
1 cup fresh cranberries
zest of a lemon (I also used the zest of a lime)
milk to brush the tops of scones before baking
sugar to sprinkle on before baking
Preheat oven 400F.
Line a baking sheet with parchment paper.
In a mixing bowl, sift together flour, baking powder, baking soda, ginger, salt and sugar. Cut in the butter until it looks like little peas. I use my hands for this but you have to be quick because the butter has to stay cold. Thats what makes them flaky. Lightly beat the egg and milk and add to flour mixture until combined. Fold in zest and cranberries.
Turn out on floured board, pat it together and roll with a rolling pin to 1 inch thickness. Cut out 2 inch rounds. I used a glass for this. Place on baking sheet. Brush tops with milk and sprinkle with sugar. Bake for 15-18 minutes. Serve warm. Yummy.
m xo
He got me a coffee mug with MY cucinamarisa logo on it. He is so adorable! He has been so supportive and patient with my new blogging adventure. Example: I'll serve the dish that I'm about to blog and the poor man is just about to dig in and I'll yell "STOP!". I forgot to photograph the recipe. Hahaha! I would find this very difficult without his encouragement.
And then of course there are all the computer challenges. He's teaching me as I go along and I have to say I'm really enjoying it. It's given me another creative outlet although I still have a lot to learn.
I really wanted to show off my new mug with you guys but I couldn't just take a picture of it sitting all by itself. How boring would that be? So I decided to bake these scones.
I had seen this particular recipe on the blog Joy The Baker and I liked it because A: it was easy and B: I had a huge bag of fresh cranberries that I bought at Costco. Also, they are not too sweet. Perfect with a cup of tea.
Fresh Cranberry, Lemon, Lime Biscuits
3 cups flour
2 1/2 teaspoons baking powder
1/2 teaspoon baking soda
pinch of ground ginger
3/4 teaspoon salt
1/4 cup sugar
3/4 cup cold unsalted butter, cubed
1 large egg, lightly beaten
3/4 cup buttermilk (I used almond milk)
1 cup fresh cranberries
zest of a lemon (I also used the zest of a lime)
milk to brush the tops of scones before baking
sugar to sprinkle on before baking
Preheat oven 400F.
Line a baking sheet with parchment paper.
In a mixing bowl, sift together flour, baking powder, baking soda, ginger, salt and sugar. Cut in the butter until it looks like little peas. I use my hands for this but you have to be quick because the butter has to stay cold. Thats what makes them flaky. Lightly beat the egg and milk and add to flour mixture until combined. Fold in zest and cranberries.
Turn out on floured board, pat it together and roll with a rolling pin to 1 inch thickness. Cut out 2 inch rounds. I used a glass for this. Place on baking sheet. Brush tops with milk and sprinkle with sugar. Bake for 15-18 minutes. Serve warm. Yummy.
|
|
|
m xo
Labels:
Baked goods
,
Brunch
,
Cranberries
,
Fruit
Thursday, 9 January 2014
Clementine Cake
Let me start by saying, baking is not my favorite thing to do. I'm not an exact measurer when I cook and I hate the fact that it's REALLY important when you bake. Trust me, I've tried to just throw ingredients in without measuring, hoping to get great results. Doesn't work. But I do like forgiving recipes like this one from Nigella Lawson. Few ingredients. One bowl. I tweaked the recipe a little by adding cardamom, cutting down the sugar and adding a pinch of salt. If you like citrus, this is the cake for you! And it's better the next day. It's almost like it was drenched in syrup. The only thing to remember is to cook your clementines ahead of time.
Clementine Cake
(adapted from How To Eat by Nigella Lawson)
| 4-5 clementines, 375g total weight
6 large eggs
200g sugar
250g ground almonds
1 heaping teaspoon baking powder
1 heaping teaspoon ground cardamom Pinch of salt |
Place clementines in a pot, cover with water and cook for 2 hours. Drain and cool. Cut in half and remove any seeds.
Preheat oven 375°F. Place clementines in a food processor and pulse. Add the rest of the ingredients and pulse again. Pour in a greased, round springform pan. Bake for 35 minutes or until an inserted toothpick comes out clean. Let it completely cool before removing from pan.
PS Let me tell you how forgiving this cake really is.
After I put the pan in the oven and starting to clean up the kitchen, I noticed there were 6 eggs sitting on the counter.
Uh oh! I FORGOT to put the eggs in! Hahaha! So I took the cake out of the oven, put the batter back in the processor, let it cool a bit, added the eggs, pulsed, poured back in pan and back in the oven it went. How did the cake turn out you ask? Fabulous! No one knew a thing. You can tell from the photos for yourself.
m xo
PS Let me tell you how forgiving this cake really is.
After I put the pan in the oven and starting to clean up the kitchen, I noticed there were 6 eggs sitting on the counter.
Uh oh! I FORGOT to put the eggs in! Hahaha! So I took the cake out of the oven, put the batter back in the processor, let it cool a bit, added the eggs, pulsed, poured back in pan and back in the oven it went. How did the cake turn out you ask? Fabulous! No one knew a thing. You can tell from the photos for yourself.
m xo
Labels:
Almonds
,
Baked goods
,
Clementines
,
Fruit
,
Gluten free
Wednesday, 1 January 2014
When life gives you panettone.....
I love the month of December for so many reasons... The first snow fall. Twinkling white lights. Latkes with applesauce and sour cream. And PANETTONE. It has to be one of my favorite things. It's a rich brioche-like bread with dried fruit. Nothing like a slice with a cup of coffee or tea as an afternoon pick me up. By January though, I usually have a couple in my pantry that I need to serve so I decided to make bread pudding with it to bring to our nieces brunch. I used the traditional panettone with dried fruit but you can easily use Pandoro and add the fruit.
Panettone Bread Pudding
1 panettone
7 large eggs
3 cups whole milk
1 cup sugar
1 tablespoon vanilla
Zest of an orange
1 teaspoon cinnamon
Pinch of salt
|
Preheat oven to 350°F
Bake uncovered for 1 hour. Serve warm or at room temperature.
Enjoy
m xo
Labels:
Baked goods
,
Breakfast
,
Brunch
,
Eggs
,
Panettone
Subscribe to:
Posts
(
Atom
)